
dinov3_ros
ROS 2 integration of Meta’s DINOv3 backbone with lightweight heads for vision tasks.
- 109
- Python
- Apache-2.0
- 13 mo ago
Simple library of TensorRT for C++ and Python with use cases
Repo Raessan/tensorrt_lib, read from GitHub 13 min ago. Raessan has not joined Take My Repo.
Raessan/tensorrt_lib is a public repo on GitHub by Raessan. Simple library of TensorRT for C++ and Python with use cases. It declares the MIT license on GitHub. It is written mainly in C++, has 2 stars and last changed on 2025-10-10. Nobody has reviewed it on Take My Repo yet, which says nothing about its quality. Read from GitHub on 2026-11-22.
In the maintainer's words. Shown from GitHub; Take My Repo does not keep a copy.
This repository contains a simple TensorRT library for C++ and Python that allows to perform inference in virtually any kind of ONNX model. It comes together with a set of use cases to demonstrate its usage in several scenarios.
The idea is to provide minimal code to get the model up and running and be versatile in any condition. The use cases represent several conditions very common during deployment of neural networks:
These libraries should run in a TensorRT-capable device with GPU and CUDA. Refer to the installation: (https://docs.nvidia.com/deeplearning/tensorrt/install-guide/index.html). The version that has been tested is TensorRT 10.9.
For Python, we also require to install libnvinfer:
sudo apt-get install -y python3-libnvinfer*
And also the CUDA library (adapt to your version):
pip install cuda-python==12.8.0
Additionally, you will need numpy and torch.
Also, we use here C++17 because the filesystem library requires so. However, this library is only used to get the names of the files in a given folder, so it can be replaced with another function that does the same work, allowing to use C++14.
To be able to use the APIs, we need an ONNX model that can be obtained with the pytorch exporter. The most important aspect to consider when exporting (because of its effect on the TensorRT lib) is the static/dynamic batching. When the batch size is 1, the export can be with static_axes (forcing later to use always a batch size of 1 in TensorRT). If the batch size will be more than 1, then we have to set the dimension of the batch size as dynamic.
TensorRT can handle these two situations:
In our library, we can do both things. If we choose a dynamic batch size to work with, we will choose our desired batch size (which will be constant for all inferences we perform).
Although the tensorrt_cpp_lib can be accessed directly, I created a handler, called nn_handler_lib to better interface with the user. Everything of the NNHandler is well explained in the nn_handler.hpp file. Some guidelines are provided here. First, the constructor accepts several parameters:
file_path_onnx is the path to the ONNX filefile_path_destination is the path where the engine will be storedprecision is the precision of the weights. By now, only float16 and float32 are accepteddla_core: if the device has DLA (such as NVidia ORIN), you can set this variable to a value different from -1. Otherwise, leave it as -1device_index: if you device has more than one GPU, you can choose which to use. If only one GPU, leave this value as 0batch_size: This is the batch size you will use for all inferences. If the model was exported with dynamic batch, you can choose any number >=1. If you exported it with static batch, only 1 is validOnce you call the constructor, the handler will either generate the engine or, if it already exists in file_path_destination, it will load it. Note that the engine name is automatically generated from the name of the original ONNX file, but appending some of the previous parameters of the constructor at the end, to differentiate among engines coming from the same ONNX model but with different features (precision, DLA, GPU index, or batch size).
Once the NNHandler is created, you can easily access the data of the NN (which is condensed in the print_data() function). However, the most important method is run_inference, which has been overloaded several times. This method accepts the input to run inference and an empty output, and it will populate the output. The most general case is to pass std::vector<std::vector<std::vector<float>>> vectors both for input and output, where the outter vector dimension represents the number of input/output, the mid vector dimension represents the batch, and the inner input dimension represents the actual stacked data. So, for example, if we have two images as inputs to the NN, where the first has size 3x100x100, the second is 1x200x200 and the batch size is 1, then the std::vector<std::vector<std::vector<float>>> input sizes will be as follows:
input.size() = 2 (two inputs)input[0].size() = 1 and input[1].size() = 1 (batch size, which is constant among inputs)input[0][0].size() = 30000 (flattened dimension of first image: 3x100x100)input[1][0].size() = 40000 (flattened dimension of second image: 1x200x200)The output follows the same pattern. However, the method is overloaded such that you can also pass (for either input or output):
std::vector<std::vector<float>> indicates that there is a single input or output, so the first dimension now is the batch size, while the second dimension is the flattened data dimension.std::vector<float> indicates that there is a single input or output, and also the batch size is 1. So, the dimension of the vector is directly the flattened dimension of the dataI have also overloaded the function such that it accepts a (vector of) raw pointers for inputs and/or outputs. This is handy to exploit the CUDA ecosystem, since raw pointers are the bridge between the CPU and the GPU, so you can pass pointers (or vectors or pointers) that are already on the GPU. This has to be specified in the function call with the arguments from_device and to_device in the handler (see nn_handler.hpp for more details). So, the available formats for inputs and outputs are extended also to:
std::vector<std::vector<float *>> is the most general case for more than one variable. The outer vector has size equal to the number of variables, the inner vector has size equal to the batch size, while the float * points to the data flattened as before (so if the image is 3x100x100, the float * points to the first element, where all contiguously stored until the 30000th element).std::vector<float *> indicates that there is a single variable, and the size of the vector corresponds to the batch size. Again the pointer points to an instance of data of that batch.float * indicates that there is a single input or output, and also the batch size is 1. So, the pointer directly points to the single instance of data.Note that, to use this functionality, all the inputs have to be located in the same device (either the GPU or the CPU), and the same for the outputs. But you can have your inputs on the GPU (and set from_device=true) while getting the outputs on the CPU (by setting to_device=false).
Also, you can mix vectors and pointers, being able to pass as input std::vector<std::vector<std::vector<float>>> and as output std::vector<std::vector<float *>>. In this case, the input will be on the CPU and the output can be chosen with the argument to_device.
In case of dealing with images, it is important to comment the blobFromImage function in the dnn package of OpenCV, since it adapts an OpenCV cv::Mat image to the format expected by NN. For a more involved and real example using this library, check this repository
The tensorrt_engine.py program contains pretty much the same functionality as the C++ version. However, it does not require a handler now because it is much easier to work with. You have to create a Options object, populate it with the information of the paths, precision, device, and batch size, and then pass it to the TensorRTEngine. These are the steps to run inference:
# We create the options variable, and only modify the out_file_path. We leave the rest of options by default
trt_options = Options()
trt_options.out_file_path = path_engine_save
trt_options.precision = precision
trt_options.batch_size = batch_size
trt_options.deviceIndex = device_index
trt_options.dlaCore = dla_core
trt_options.out_file_path = path_engine_save

# Create the engine, build and load the network
engine = TensorRTEngine(trt_options)
engine.build(path_model_onnx)
engine.loadNetwork()

...

# Inference
output_pred = engine.do_inference(inputs, out_format = "auto") # out_format can be "auto", "numpy" or "torch"
The only difference is how to represent inputs and outputs. Both are lists, where the number of elements is equal to the number of inputs/outputs. Each member of the list can either be a numpy array or torch tensor (either in cpu or cuda), and types can be mixed. The tensors have as first dimension the batch, and the rest of dimensions are the original dimensions of the data (it does not need to be flattened as in the C++ library because it is automatically done). Regarding the output format, it can have three values:
In our previous examples with two inputs, where the first has size 3x100x100, the second is 1x200x200 and the batch size is 1, the inputs list will be of size 2, where inputs[0] is a numpy/torch tensor of size (1, 3, 100, 100) and inputs[1] is a numpy/torch tensor with size (1, 1, 200, 200) (where the first 1 is because of the batch size).
This library does not include the CUDA support like C++ since the inputs and outputs are always numpy arrays, and it is more common to work with CUDA in C++.
The use_cases folder is only for demonstration purposes but it is not needed to build your own apps. All the required code for TensorRT are in tensorrt_cpp and tensorrt_python.
In this repo, you can directly use the models and data provided and omit this step. The models are in use_cases/models and the data in test_data. If you don't to omit this step or want to create new data, please keep reading this section.
Before using the TensorRT libraries, we have to prepare some data and a model, that have been defined in the use_cases/scripts folder. Note that this folder has two subfolders, single_io and multi_io. The former is to create a dummy model and data for a single input and single output, while the latter is to create a multi input/output model.
The first step is to choose one of the folders and run dummy_model.py, which will generate a model and save the weights in the use_cases/models folder. Then, the model can be exported either with static (single batch) or dynamic axes (multi batch), with the files export_onnx_single_batch.py and export_onnx_multi_batch.py. To generate the input and output data, you can run save_data.py. This will write the data in .txt format in the use_cases/test_data, and more specifically, to the subfolder single_io or multi_io according to the selected model. The data is matrix form such as the number of rows is the number of batches, and the columns are the flattened dimensions of the variable (so, if the variable is 3x100x100 with batch 2, its file will store a matrix with size 2x30000).
Last, you can check the inference_time with inference_time.py, if you want to compare it with the TensorRT performance.
As a result, the use_cases/models will be filled with the weights and the ONNX models, and use_cases/test_data will be filled with the data, that will be used to compare the output of the TensorRT algorithm with the expected.
To test the inference in C++, I created several programs to test any combination of single/multi input, single/multi batch and cpu/gpu inputs and outputs, to show how to handle each case. They are all in the use_cases/inference_cpp folder. Basically, they load the input and output data from use_cases/test_data, and they perform inference in any scenario, displaying the inference time and the predicted output compared to the expected.Additionaly, These programs use the tensorrt_cpp libraries and a set of simple functions that are in use_cases/inference_cpp/include. These are auxiliar functions to read data from a .txt file and to calculate the mean square error (this error will be used to compare the expected and the predicted outputs).
Take a look at the CMakeLists to see how to link the apps with the libraries. To compile, get in the use_cases/inference_cpp folder in a terminal and write:
mkdir build
cd build
cmake ..
make
This is the most critical step, so Hooray if it compiles! Afterwards, you will be able to run any of the apps. For example, inside the build folder, you will be able to execute: ./single_io_single_batch. If everything goes well, you will see some output in the terminal. The first time you execute it, it takes longer because it has to create the TensorRT engine, but once created, it runs much faster in successive executions.
I think it is very useful to see the code inside these apps (from simpler to more complex) because they show how to arrange the data with minimal examples.
This is exactly the same as done in C++. They can be executed directly with the command python single_io_single_batch.py, for example.
It's important to note that an engine generated by the C++ library can be loaded by the Python library, and vice versa.
If you face compilation issues, it is possible that the TensorRT library does not match the expected by the library. There are methods, such as enqueueV3 in tensorrt_engine.cpp or execute_async_v3 in tensorrt_engine.py that may not be compatible with your TensorRT version. Also, remember that C++17 is needed to compile (although it can be downgraded if the dependency to filesystem is removed).
I want to add the quantization capability to the model, keeping its simplicity and with examples of its usage.
Inspirational repositories include the following:
My motivation was to create a generic library to be able to used in many scenarios. For example, the mentioned C++ and Python APIs are prepared to work with images specifically, and I was more interested in creating a general library that facilitates the data management as much as possible regardless of its origin, and also for any model. In our case, dealing with an image of OpenCV is not directly possible but it is very easy to extract a std::vector<float> or float * from it, which are accepted inputs for these algorithms.
Raessan/tensorrt_lib is a public repo on GitHub by Raessan. Simple library of TensorRT for C++ and Python with use cases.
It declares the MIT license on GitHub.
Its maker has not tagged a system, so it is unknown here. Its README says what it needs.
Open "Take it" on its page: Take My Repo writes an install plan for your machine and hands it to your AI agent (Claude Code, Codex or Cursor), which asks you before each step. Take My Repo has not tested it on any machine.
Its last change on GitHub was on 2025-10-10. Take My Repo does not judge from that whether it is maintained.
Nobody has reviewed it on Take My Repo yet, which says nothing about its quality.
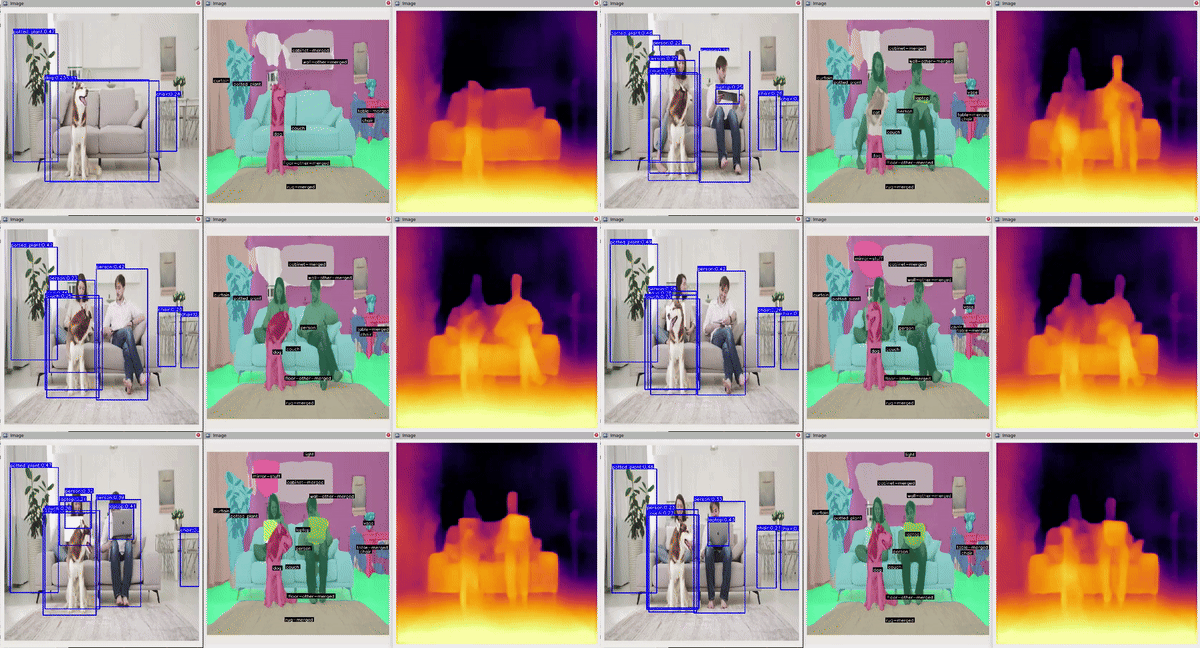
ROS 2 integration of Meta’s DINOv3 backbone with lightweight heads for vision tasks.
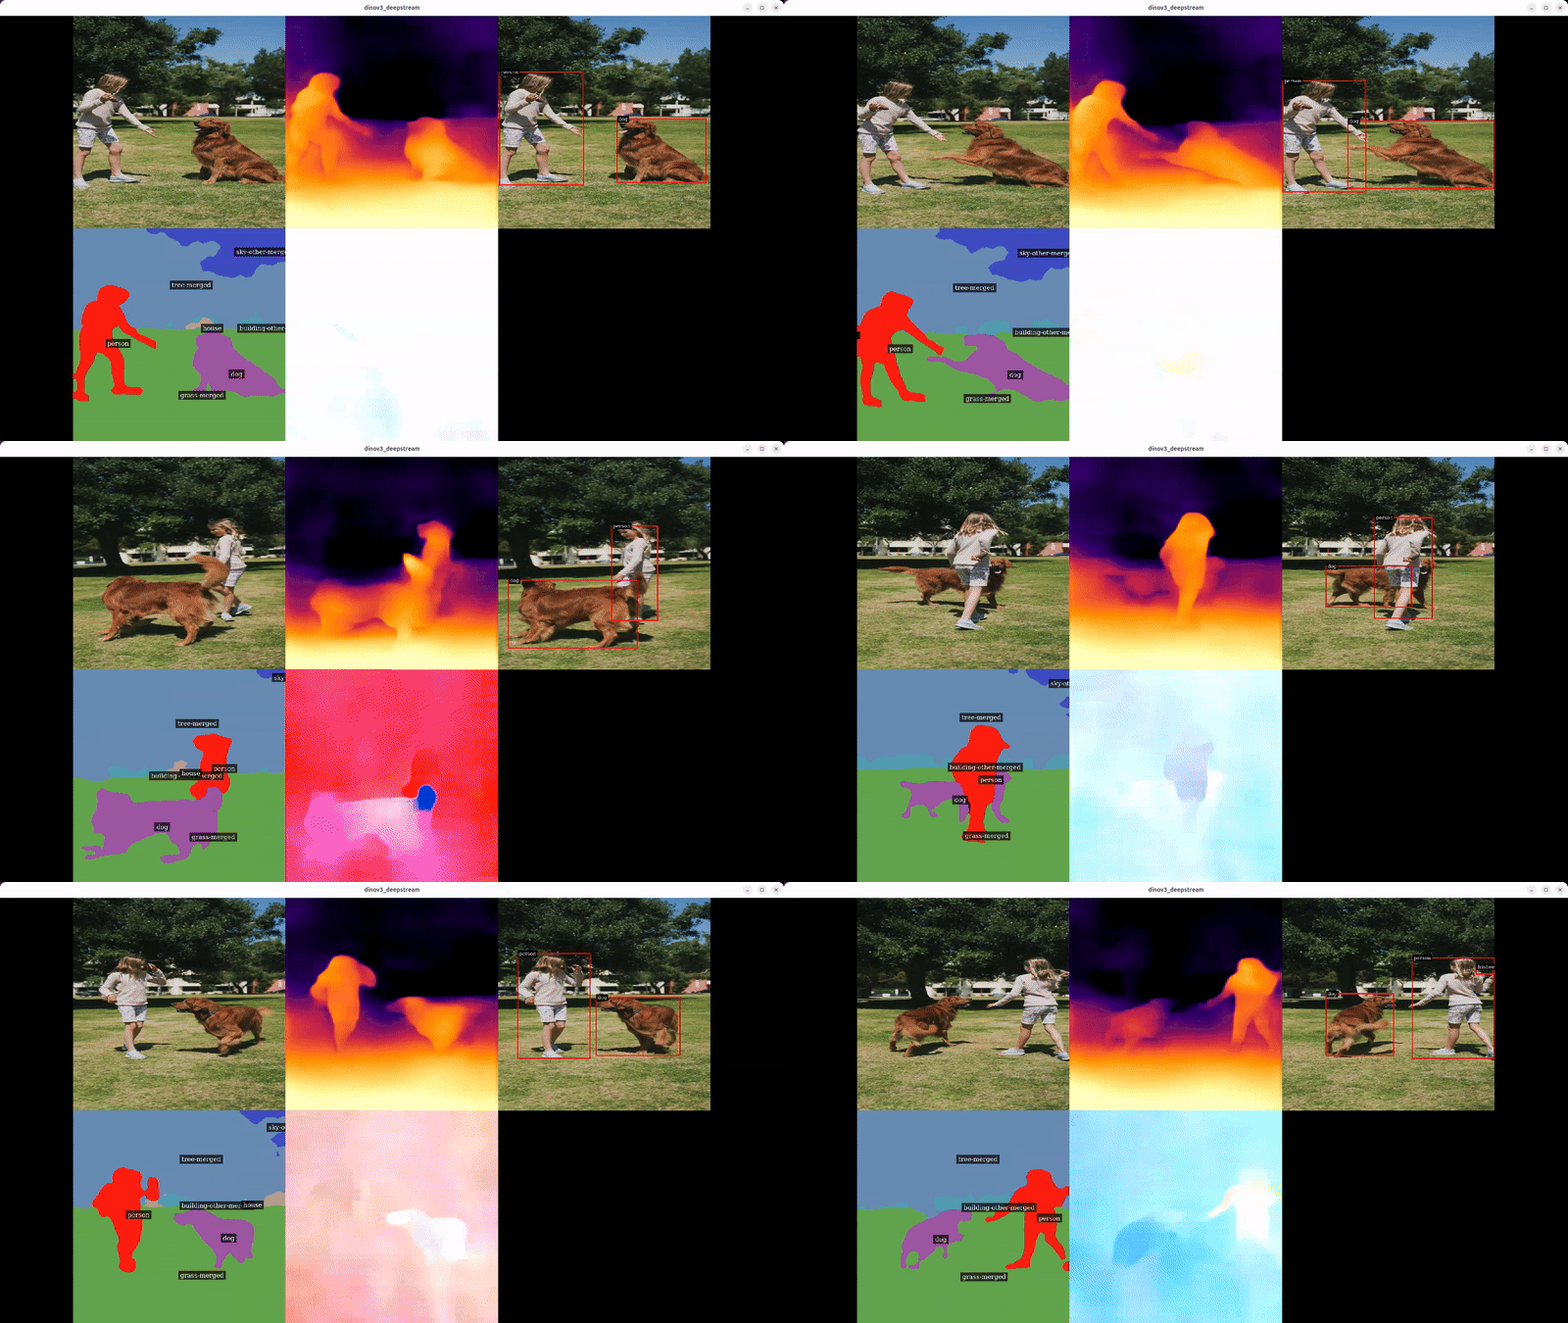
DeepStream integration of Meta’s DINOv3 backbone with lightweight heads for vision tasks.

Real-time monocular depth estimation with Depth Anything V3 and NVIDIA DeepStream 8.0.

Lightweight head for depth estimation using DINOv3 as backbone
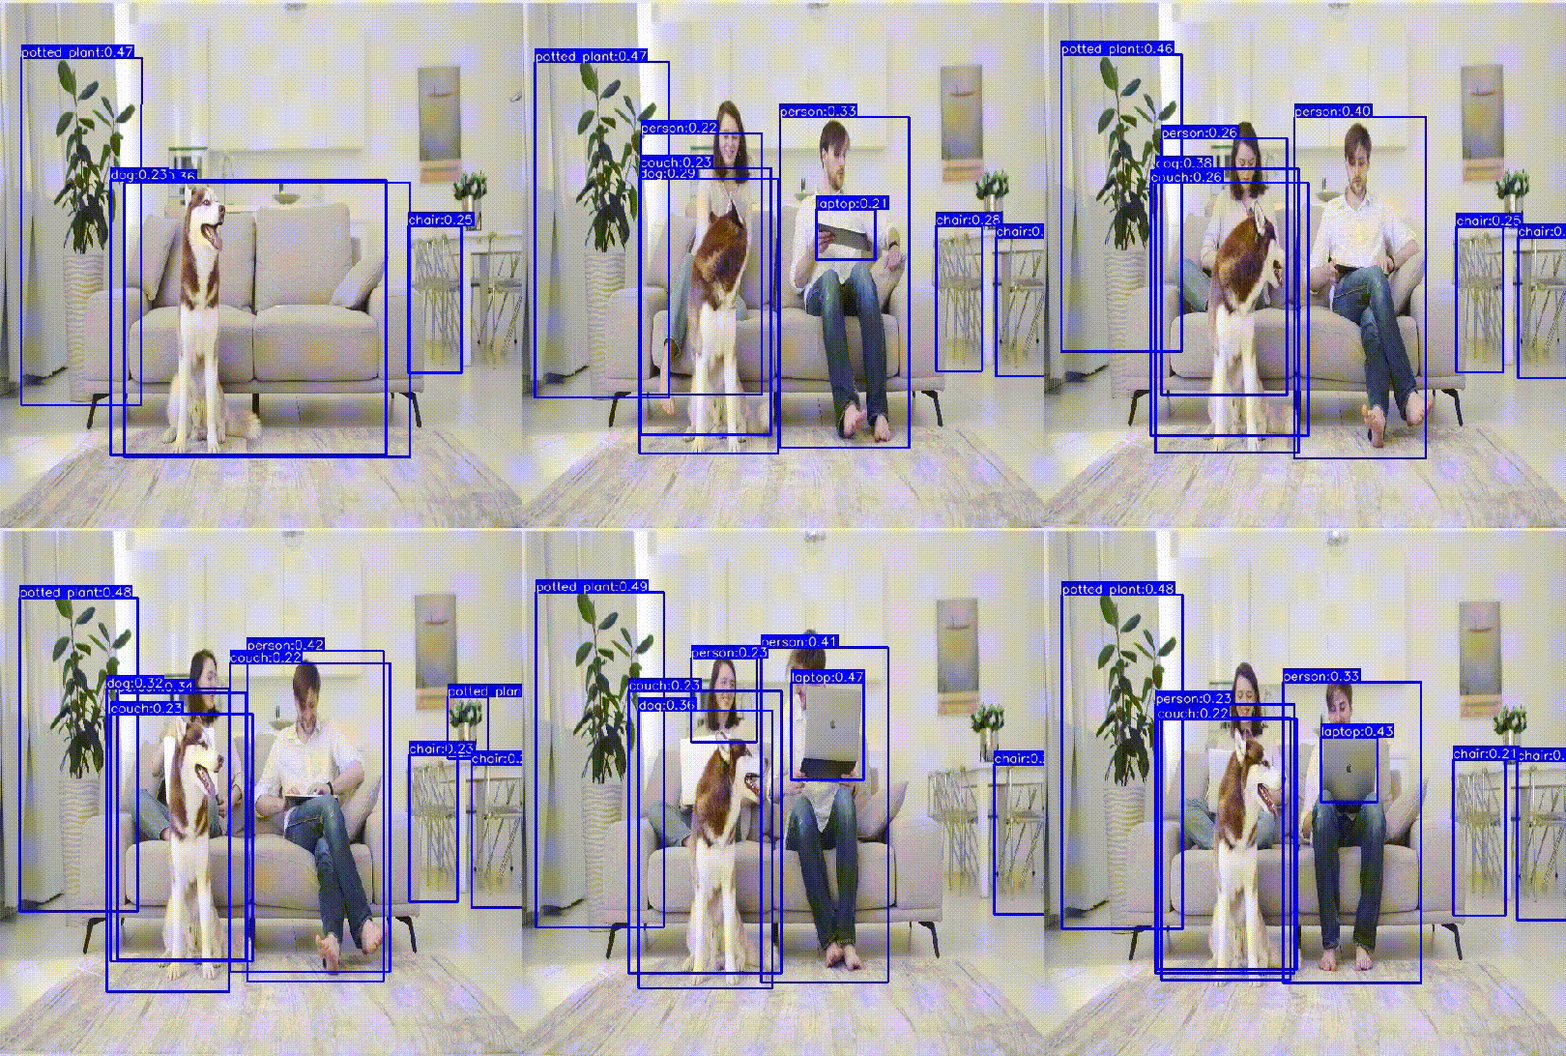
Lightweight head for object detection using DINOv3 as backbone
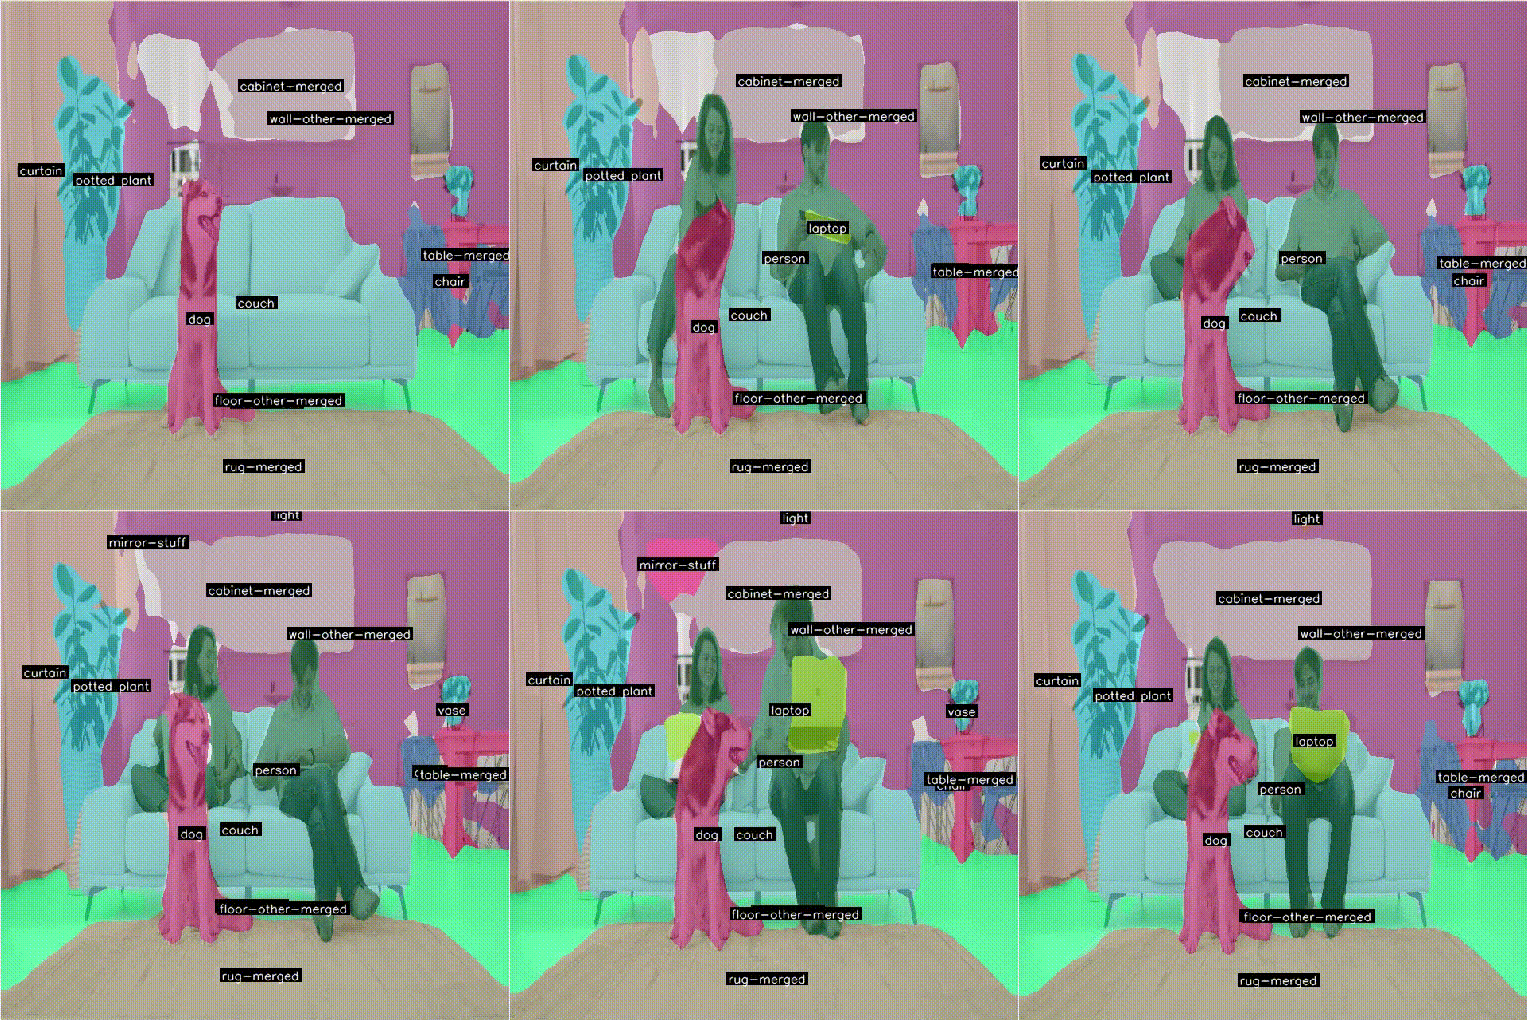
Lightweight head for semantic segmentation using DINOv3 as backbone
