
esp-box-emu
Star Wars: Dark Forces, Doom, NES, Gameboy/Color, Sega Master System / GameGear, Sega Genesis / MegaDrive, and MSX I/II Emulators running on ESP BOX and ESP BOX-3 with a custom gamepad
- 151
- MIT
- 10 h ago
Repo esp-cpp/esp-box-emu, read from GitHub 1 min ago. esp-cpp has not joined Take My Repo.
In short
esp-cpp/esp-box-emu is a public repo on GitHub by esp-cpp. Star Wars: Dark Forces, Doom, NES, Gameboy/Color, Sega Master System / GameGear, Sega Genesis / MegaDrive, and MSX I/II Emulators running on ESP BOX and ESP BOX-3 with a custom gamepad. It declares the MIT license on GitHub. It is written mainly in C++, has 151 stars and last changed on 2026-11-22. Nobody has reviewed it on Take My Repo yet, which says nothing about its quality. Read from GitHub on 2026-11-22.
esp-box-emu
 |
 |
A pocket-sized, Game Boy-style retro emulation handheld built around the ESP32-S3-BOX. Drop in a micro-SD card of ROMs and play NES, Game Boy / Color, Master System / Game Gear, Genesis, MSX and PICO-8 games — plus ports of Doom and Dark Forces — on hardware you can 3D print and build yourself.

doom_test-compressed.mp4
Tip
Sister project: tab5-emu, the same launcher, cores and web console on the M5Stack Tab5 (ESP32-P4, 5" 1280x720), which adds the Super Nintendo, the Game Boy Advance, ScummVM and native ports of Metal Gear Solid, The Phantom Menace and Jedi Knight. The two share their emulator cores, web console and USB link as submodules, so a fix in one reaches the other. See The esp-cpp handhelds.
Table of Contents
Overview
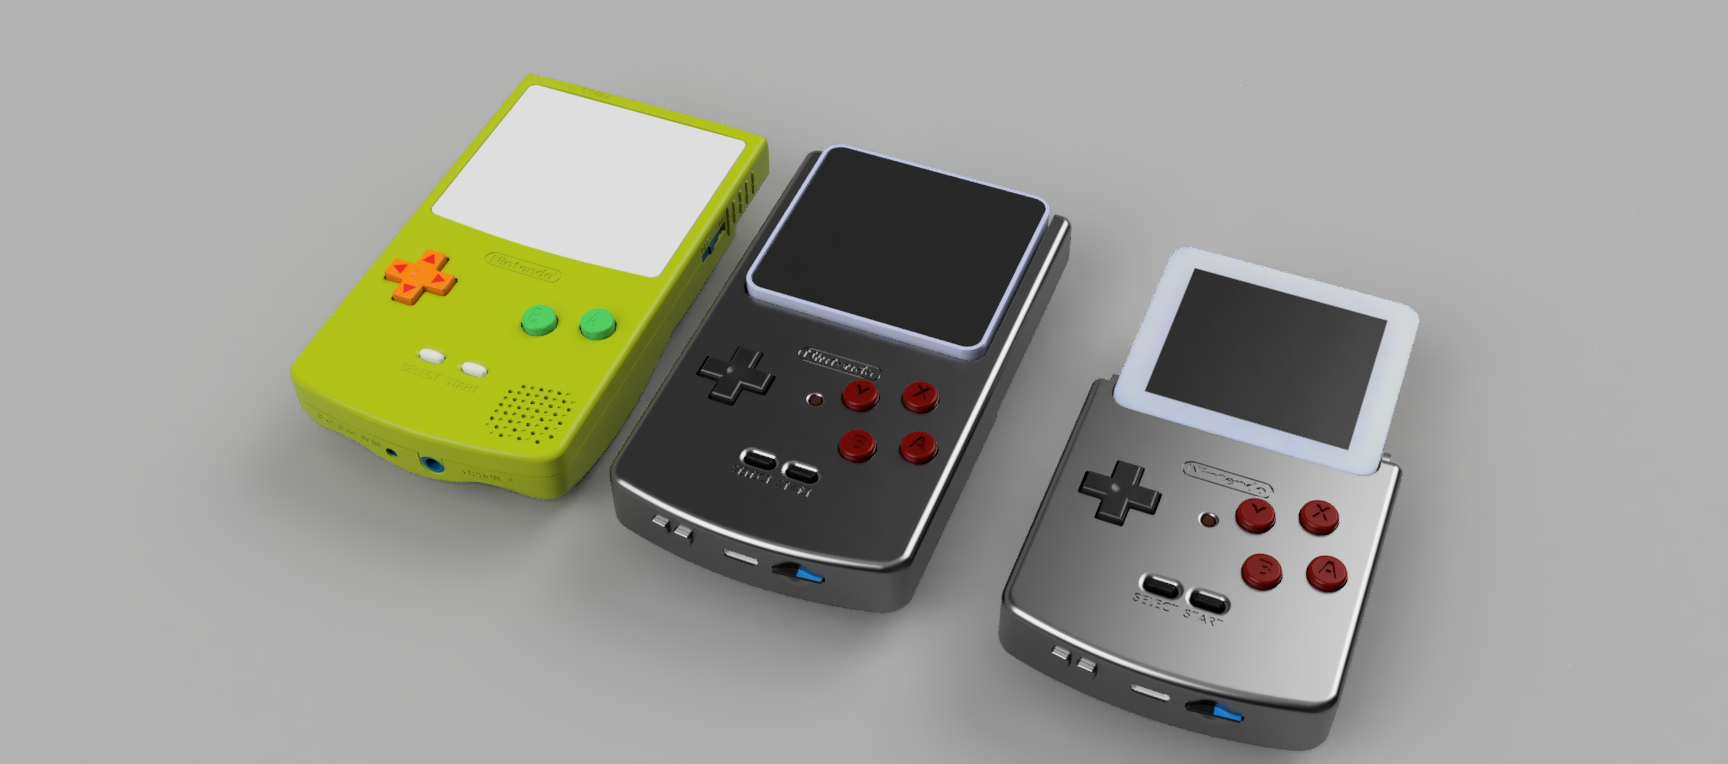
The ESP-BOX-EMU turns an ESP32-S3-BOX or ESP32-S3-BOX-3 into a handheld retro game console. A custom add-on board and 3D-printed shell wrap the BOX in a Game Boy Color form factor — real d-pad and buttons, battery, haptics, and a micro-SD slot — and the firmware runs a stack of emulators behind a polished LVGL interface with boxart, save states, and settings.
Highlights
- 🎮 Eight systems and engines — NES, Game Boy / Color, Sega Master System / Game Gear, Sega Genesis, MSX 1/2 and PICO-8, plus ports of Doom and Dark Forces — all with sound.
- 🧬 Full-speed Genesis — a custom dual-core port of gwenesis splits the emulation across both of the ESP32-S3's cores (CPU + video on one, the sound unit on the other) for full-speed Sega Genesis / Mega Drive with audio.
- ⚡ No reboots — every core and game loads on demand right from the menu, so you can jump between titles and even different systems without ever restarting the device.
- 🕹️ Real controls — d-pad, A/B/X/Y, Start/Select and volume buttons in a familiar Game Boy Color layout; the emulator is auto-selected from the ROM file extension.
- 💾 Load from SD — keep ROMs, boxart, and save states on a micro-SD card, and mount the card over USB-C as a mass-storage drive (TinyUSB MSC).
- 💤 Save anywhere — up to 5 save slots per game, each with an auto-generated screenshot shown in the load menu.
- 🔋 Portable — 1000 mAh LiPo battery with USB-C charging.
- 📳 Haptics — LRA haptic feedback (DRV2605), including in-game effects in Doom (weapon fire, taking damage, pickups, and more).
- 🖼️ Polished UI — an LVGL launcher with boxart, save counts and each console's colors, a console picker, settings (sound, brightness, display scaling, haptics) and a pause menu, shared with tab5-emu (emu-ui).
- 🌐 Web console — plug into a computer and Chrome or Edge offers a control panel: watch and play the screen, manage games and boxart, browse the SD card, change settings, and update the firmware, with nothing to install.
- 🛠️ Fully open hardware — 3D-printable GBC-style case and an open PCB (Fusion/Eagle and atopile + KiCad), all included in this repo.
Emulators
The right emulator is chosen automatically from each ROM's file extension, and games load on demand straight from the menu — no reboot required. Pick a title, play, then drop back to the menu and launch a different game (or a completely different system) without ever restarting the device. Every core runs with audio, and several offer an Unlocked mode (toggle with the X button) that removes the frame-rate cap for maximum speed.
| System | Core | Unlocked mode | Notes |
|---|---|---|---|
| NES | nofrendo | ✅ | D-Pad / A / B / Start / Select |
| Game Boy / Color | gnuboy | ✅ | D-Pad / A / B / Start / Select |
| Sega Master System / Game Gear | smsplus | ✅ | D-Pad / A / B / Start / Select |
| Sega Genesis / Mega Drive | gwenesis | — | Full speed with sound; 6-button pad (A→B, B→A, C→Y) |
| MSX 1 / 2 | fmsx | — | D-Pad / A / B (fire buttons); Start = F1 (pause in Konami games); Select = on-screen keyboard; Y = fMSX menu |
| Doom | prboom | — | Full speed with audio and haptic feedback |
| Dark Forces | The Force Engine (via BSzili's Amiga port) | — | Software renderer, iMuse sound effects and OPL3 music; see Dark Forces setup |
| PICO-8 | femto8 | — | .p8 and .p8.png carts; D-Pad, A/Y = O, B/X = X, START = PICO-8 pause menu; save states; cartdata saves to pico8/cdata/; see PICO-8 setup |
Every core is a submodule (esp-cpp/nofrendo,
gnuboy, smsplus,
gwenesis, fmsx,
prboom, TheForceEngine,
femto8): the core plus its port/ glue to
BoxEmu, shared with tab5-emu. Each
components/<core>/CMakeLists.txt here is the board's wrapper for it
(requirements, compile flags, linker fragment).
🧬 Full-speed Genesis on the S3. The Genesis core ships with a custom dual-core modification of gwenesis that spreads the workload across both of the ESP32-S3's CPU cores: core 0 runs the 68000 CPU and VDP (video), while core 1 runs the sound unit (Z80 + YM2612 FM synth + PSG). Sound-chip writes are queued and applied in order on core 1, which lets Genesis / Mega Drive games run at full speed with audio — something a single core can't keep up with.
Doom controls and haptics
Controls: A fire / enter · B strafe / backspace · X use · Y weapon toggle · START escape · SELECT map.
Haptic feedback is triggered when you fire a weapon (varies by weapon), take damage (scaled to the health/armor lost), interact with something (e.g. a door), or pick up a weapon, ammo, health, armor, a power-up, or a key / card.
Dark Forces controls
In a mission: D-pad move / turn · A fire · B jump · X use · Y next weapon · START escape menu. Hold SELECT as a modifier: SELECT + Left/Right strafe · SELECT + Down crouch · SELECT + Up automap · SELECT + A secondary fire · SELECT + B headlamp · SELECT + X gas mask · SELECT + Y previous weapon · SELECT + START night vision. Running is always on.
Menus, briefings and cutscenes: the D-pad moves a virtual mouse cursor, A clicks, START is Enter, B is Escape (skips cutscenes) and Y is Space. Quitting from the game's escape menu returns to the emulator menu.
Typing an agent name: hold SELECT: Right adds a letter, Up/Down change the last letter, Left deletes it; release SELECT and press START to confirm.
The emulator's own pause menu (touch button or START+SELECT) still works for video scaling and save slots; save slots only work while in a mission.
Gallery
Captured on the device over the USB link (emulink screenshot), at the
games' own resolution, scaled up.
 NES: Super Mario Bros. 3 |
 Game Boy Color: Link's Awakening DX |
 Genesis: Sonic the Hedgehog 3 |
 Master System: Sonic the Hedgehog |
 Game Gear: Streets of Rage II |
 MSX: Metal Gear 2: Solid Snake |
 Doom (PrBoom) |
 Dark Forces (The Force Engine) |
 PICO-8: Celeste |
On the hardware:


box-emu-input-refactor-compressed.mp4
esp-box-emu.housing.and.assembly.v162-compressed.mp4
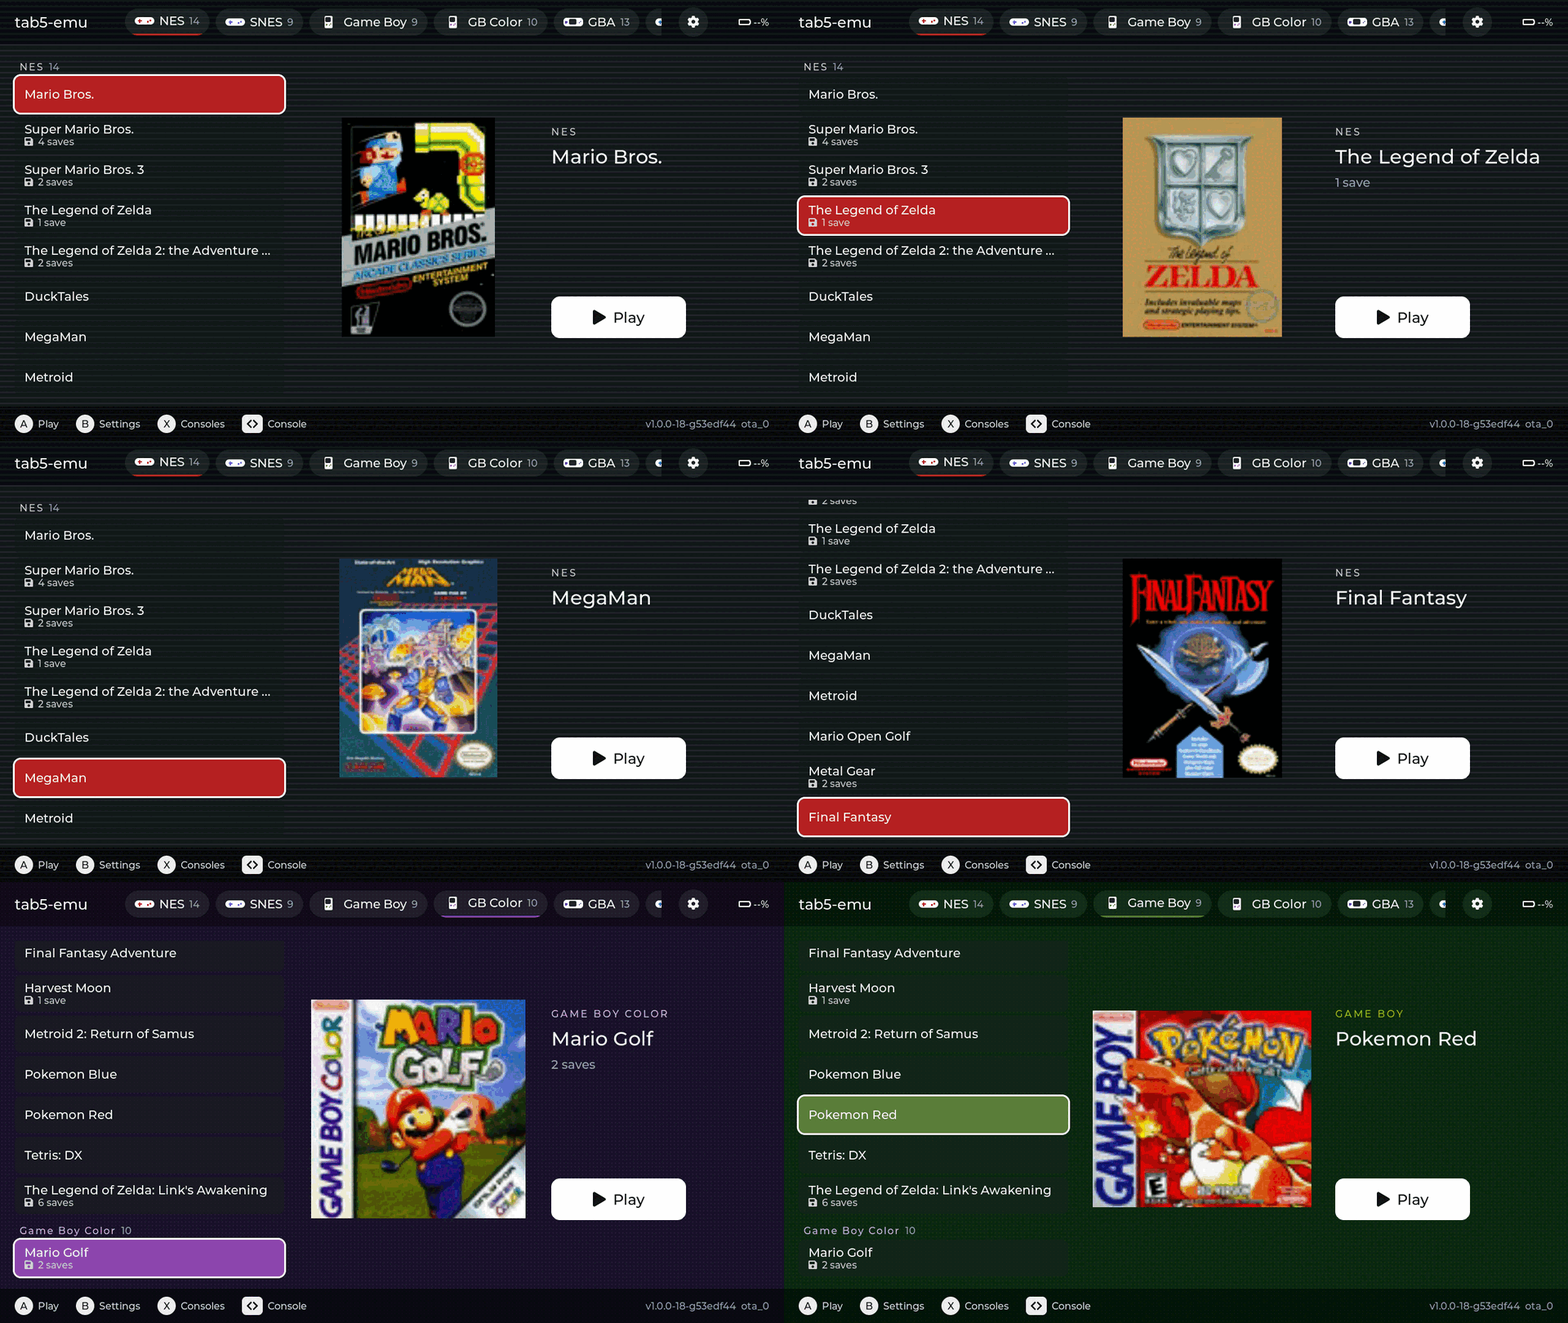
The launcher


- Games by console: the list is grouped by console, and each console has its own colors and background. Left / right jump to the previous / next console.
- Save counts: a save badge after each game's name shows how many save states it has.
- Console picker: tap the console chip (or press X) for a grid of the
consoles, to show only one console's games or all of them again.
emulink filter <console>does the same over USB. - Boxart and names come from
metadata.csvon the card (see ROMs and SD Card Setup). Per-console art can go inboxart/consoles/<key>.jpg. - A or Start plays the selected game; B or Select opens the settings: volume, mute, brightness, video scaling (original, fit, fill), haptics, the SD card as a USB drive, resume last save and the Genesis CPU overclock.
- Pause menu in game (the touch button or Start+Select): resume, save and load up to 5 slots with screenshots, reset, quit, and the same settings.
Quick Start — Play It
Already have the add-on hardware (or an ESP32-S3-BOX you want to flash)? You don't need to build anything from source — a prebuilt one-time programmer is published with every release.
-
Download the
programmerfor your OS (windows,macos, orlinux) from the latest releases page. -
Unzip it.
-
Run it: double-click the
.exeon Windows, or run it from a terminal on macOS / Linux, e.g.:./esp-box-emu_programmer_v1.0.0_macos.bin
(The version in the filename matches the release you downloaded.)
Then set up a micro-SD card with your ROMs and you're ready to play.
Web Console
Plug the emulator into a computer and it hands you a control panel. Connect the ESP-BOX-EMU's USB-C port to a computer running Chrome or Edge and the browser pops up a notification pointing at esp-cpp.github.io/esp-box-emu, the firmware's WebUSB landing page. Click it, pick the emulator, and you're in: no drivers, no app, no serial terminal. Watch the game being played, take a screenshot, add a new game with its boxart, or update the firmware, all from a browser tab.


What you can do from each tab:
- 📊 Dashboard: what's running right now (with its boxart), live frame-rate and memory graphs, the firmware and partition it booted from, why it last reset, and a button that hands the SD card to your PC as a USB drive.
- 🖥️ Screen: grab the game's (or the launcher's) screen, or turn on Live to keep it updating, and save it as a PNG. Play with the on-screen controller or your keyboard (arrows, Z / X / A / S, Enter = Start), save and load states in any slot, or quit the game.
- 📚 Library: every game on the card, grouped by console with its boxart
and a game count per console. Search, filter by console (and, if you like,
filter the handheld's launcher the same way), start any game with Play,
or Add a game: drop in the ROM and a cover and the page uploads both and
adds the line to
metadata.csvfor you. Remove takes one out again. - 📁 Files: browse the SD card, download files, upload by drag and drop, create folders and delete things (handy for copying save states off the card).
- ⚙️ Settings: volume, mute, brightness, video scaling, resume last save and the haptic effect. The handheld's own menu shows each change right away, and it's saved to the card a moment later.
- 🔧 System: chip, flash, PSRAM, heap, ESP-IDF version, OTA state and the
services on the link; restart the emulator (or into download mode for
idf.py flash), and Update firmware, which restarts into the updater and opens the espp OTA console to send a newbuild/esp-box-emu.bin. - 📜 Console: the device's log over Web Serial (pick the console's port), with a line filter, auto-follow, and save to a file.


How it works: the firmware's composite USB device includes a vendor
(WebUSB) interface that carries the same request/response link as
tools/emulink, plus a USB descriptor that names the
landing page, which is how the browser knows where to send you. The page is
plain HTML, CSS and JavaScript modules in web/ (no build step),
published to GitHub Pages from main, and it talks to the device directly
from your browser; nothing goes through a server. Only one program can use the
link at a time, so close emulink (or the page) before switching between them.
Hacking on the page? Serve it locally with
python3 -m http.server -d web 8000 and open http://localhost:8000 (WebUSB
needs https or localhost). See web/README.md for the
details.
Build the Hardware
The add-on is designed to match the Game Boy Color form factor and reuse GBC button plastics and silicone membranes for an authentic feel. The shell is meant to be 3D printed (PLA or PETG on a Prusa i3 mk3+) and assembled with M3 screws.
Case / mechanical — printable files are in ./mcad or on Printables. CAD is on Fusion 360 (free viewer):
Electronics — schematic and layout files are in ./ecad, provided as both Fusion/Eagle files and atopile + KiCad sources. You can also order the board directly:
GBC replacement buttons / membranes used for a good play feel:
- Silicone pads for Game Boy Color (1)
- Silicone pads for Game Boy Color (2)
- Game Boy Color button plastics
Build the Firmware
This repo uses submodules, so clone it recursively:
git clone --recurse-submodules git@github.com:esp-cpp/esp-box-emu
If you already cloned it non-recursively (or forgot the flag), pull the submodules with:
git submodule update --init --recursive
Then build, flash, and open the serial monitor with ESP-IDF:
idf.py -C updater build   # once: the updater app, which goes in ota_1
idf.py -p PORT flash monitor
The updater (updater/) is what over-USB updates (tools/emulink) reboot
into, and what a bad update rolls back to, so build it before the first
flash: the emulator's idf.py flash then writes both. After that, updates
can go over USB with emulink ota.
Replace PORT with your board's serial port. To exit the monitor, type
Ctrl-].
Measuring performance and memory
The firmware prints greppable one-line reports on the serial console so a captured play session doubles as a profile:
[mem] phase=boot|menu|launch|quit ...— internal RAM / PSRAM free and largest free block at each phase, with[mem] delta ...lines at launch and quit relative to the menu (a non-zero delta after quitting is a leak or fragmentation).[mem] block|region|task phase=...— at boot and launch, every internal-RAM block above a threshold (labelled with the task whose stack it is), each registered heap region's used/free/largest, and every task's stack high-water mark (stack_free_min, repeated at quit after a full play session).core_overlay: CORE: N KB of code loaded in N ms (N KB of PSRAM, N constructors)/core_overlay: CORE: unloaded— the game cores' code overlay (components/core_overlay): every core's code is linked at one address and only the running core's is in PSRAM (the rest of the firmware's code is copied into PSRAM at boot), so the other cores' ~1.5 MB of code stays in flash. The build prints the store and each core's code size (core_overlay: N KB of core code stored in flash ...) and fails if resident code or data reaches into the overlay.[genesis mem] NAME: N bytes -> INTERNAL|PSRAM— where each big emulator buffer landed (the Genesis gets noticeably slower when its hot buffers fall back to PSRAM).[genesis perf] fps=.. frame=..us 68k=..us vdp=..us convert=..us barrier=..us ...— per-frame time breakdown averaged over the last 300 frames (~5 s): 68000, VDP render, RGB565 conversion, time core 0 spends waiting for the core-1 sound unit, present/audio, pacing sleep,late=/skipped=/dropped=frame counts (skipped = emulated without rendering because the panel could not show the frame),blit=(video task time per displayed frame), the core-1 sound unit's own frame time, and Z80 counters (irq=V-ints taken,busreq=,halted=scanline slices lost to a held bus,wto=handshake timeouts,ymw=Z80→YM2612 writes). Compile withGENESIS_PERF=0to remove it.[display] lcd spi clock: N Hz— the clock the LCD SPI device actually got (the ESP32-S3 can only divide 80 MHz by integers, so a 60 MHz request runs at 40 MHz: 320×240×16bpp is ~31 ms per frame, the panel's ~31 fps ceiling).
Capture and summarise a session (performance PRs should include a before/after from the same game and the same ~1 minute of play):
python tools/serial_capture.py PORT --out before.log --until "delta phase=quit"
# ... flash the change, play the same section again ...
python tools/serial_capture.py PORT --out after.log --until "delta phase=quit"
python tools/perf_report.py before.log after.log
perf_report.py prints each run's launch/quit memory, buffer placement, and
the perf-line averages side by side with deltas.
ROMs and SD Card Setup
Format a micro-SD card as FAT and add your ROMs (.nes, .gb, .gbc, …),
boxart images (.jpg), and a metadata.csv file (see the example
metadata.csv).
Boxart images
Boxart displays best at 100 px wide. The
./boxart/source/resize.bash script resizes every
.jpg in boxart/source to 100 px wide (preserving aspect ratio) and writes the
results to the boxart folder. Copy those onto the SD card and reference them
from your metadata file.
Dark Forces setup
Dark Forces is played with the original (purchased) game data; the engine does
not include it. Copy the DOS install files onto the SD card into a single
folder, for example darkforces/:
darkforces/DARK.GOB
darkforces/SOUNDS.GOB
darkforces/SPRITES.GOB
darkforces/TEXTURES.GOB
darkforces/LFD/*.LFD       (menus, briefings and cutscenes)
Then reference DARK.GOB from metadata.csv:
darkforces/DARK.GOB, boxart/darkforces.jpg, Star Wars: Dark Forces
Settings (settings.ini) and agent / save files are written to the same folder.
PICO-8 setup
PICO-8 carts are plain .p8 text files or .p8.png cartridge images. Put them
in a folder on the card (for example pico8/) and reference them from
metadata.csv:
pico8/celeste.p8, boxart/celeste.jpg, Celeste Classic
Carts that use cartdata() save to pico8/cdata/. The 128x128 screen shows
1:1 in the "original" video mode and scaled to 240x240 in "fit". Multi-cart
games that load("#id") their other carts work when those carts sit in the
same folder as id.p8.png / id.p8.
What to expect: the Lua interpreter runs at roughly 1.3M instructions per
second on the S3 (its heap lives in PSRAM), enough for carts of Celeste's
weight at full speed, but CPU-heavy carts close to PICO-8's limit run at a
few frames per second. Save states work (the cart's Lua heap and PICO-8
RAM are snapshotted between frames); carts' own cartdata() saves are kept
separately; there is no mouse or keyboard.
metadata.csv format
Each line maps a ROM to its boxart and display name:
<rom filename>, <rom boxart filename>, <rom display name>
Example:
mario.nes, boxart/mario.jpg, Mario Bros.
super_mario_1.nes, boxart/super_mario_bros_1.jpg, Super Mario Bros.
super_mario_3.nes, boxart/super_mario_bros_3.jpg, Super Mario Bros. 3
zelda.nes, boxart/zelda1.jpg, The Legend of Zelda
zelda_2.nes, boxart/zelda2.jpg, The Legend of Zelda 2: the Adventure of Link
mega_man.nes, boxart/megaman1.jpg, MegaMan
metroid.nes, boxart/metroid1.jpg, Metroid
pokemon_blue.gb, boxart/pokemon_blue.jpg, Pokemon Blue
pokemon_red.gb, boxart/pokemon_red.jpg, Pokemon Red
pokemon_yellow.gbc, boxart/pokemon_yellow.jpg, Pokemon Yellow
links_awakening.gb, boxart/tloz_links_awakening.jpg, The Legend of Zelda: Link's Awakening
links_awakening.gbc, boxart/tloz_links_awakening_dx.jpg, The Legend of Zelda: Link's Awakening DX
Features and Roadmap
A checklist of what's implemented and what's still in progress.
Emulation
- Auto-select emulator by ROM extension: NES, GB/GBC, SMS/GG, MSX, Genesis, Doom, Dark Forces, PICO-8
- On-demand core loading — every emulator and game loads at runtime with no reboot needed to switch games or systems
- Custom dual-core Genesis (gwenesis): 68000 + VDP on one ESP32-S3 core, sound unit (Z80 + YM2612 + PSG) on the other, for full-speed audio and gameplay
- Doom haptic feedback 🚀
- Save state (with automatic save-screenshot creation to the SD card)
- Load state — up to 5 slots per game, with save-screenshot previews
- Shared-memory system so many emulators can be built in together while keeping their hot state in fast internal RAM
- Dark Forces (The Force Engine port; software renderer with sound and music)
- SNES emulator (WIP)
User interface
- LVGL ROM-select menu with boxart and title, navigable by controller
- Games grouped by console: left / right jump to the previous / next
console, and the console in the header (tap it, or press X) opens a picker
that shows only one console's games (outlined while filtered;
emulink filter <console>over USB) - LVGL settings menu (volume, video, haptics) and in-game pause menu
- GUI data (titles + boxart) loaded from the metadata file
- Launcher and pause menu shared with tab5-emu (emu-ui), previewed on a desktop
Video and audio
- Emulator framebuffers in SPIRAM, with queued screen transfers for maximum draw speed
- Video scaling with ORIGINAL, FIT, and FILL display modes
- Audio output over I2S via the es8311 codec (codec component)
- Mute button toggles audio while a ROM is running
- Haptic feedback via a DRV2605-driven LRA
- Decorative graphics in the black borders during NES / GB/C emulation (WIP)
Storage and input
- micro-SD (FAT) filesystem over SPI
- TinyUSB MSC device to expose the SD card to an attached USB host
- Memory-mapping of the selected ROM from storage into a raw data partition (SPI flash)
- D-pad + A/B/X/Y + Start/Select input (MCP23x17 on v0 hardware, AW9523 on v1)
- Touchscreen input (tt21100 component)
Hardware
- Control-board schematic / layout: joystick / d-pad / buttons (via I²C I/O expander + ADC), battery, charger, DRV2605 haptics, micro-SD, boost converter, and USB 2.0 passthrough from USB-C
- Case CAD in the GBC footprint: USB-C port, micro-SD slot, Start/Select, ABXY, and D-pad in familiar locations
The esp-cpp handhelds
esp-box-emu and tab5-emu are one
project on two devices. Both are built on ESPP
and share the emulator cores, the USB link, emulink and the web console.
| esp-box-emu | tab5-emu | |
|---|---|---|
| Device | ESP32-S3-BOX / BOX-3 in a 3D-printed Game Boy Color style shell with a custom PCB | M5Stack Tab5, off the shelf |
| Chip | ESP32-S3, 2× Xtensa LX7 @ 240 MHz, PSRAM | ESP32-P4, 2× RISC-V @ 360 MHz, 32 MB PSRAM |
| Screen | 2.4" 320x240 touch | 5" 1280x720 touch |
| Controls | d-pad, A / B / X / Y, Start / Select, haptics | touch gamepad, USB gamepads / keyboards / mice |
| Systems | NES, Game Boy / Color, Master System / Game Gear, Genesis, MSX, PICO-8, Doom, Dark Forces | everything on the left, plus SNES, GBA, ScummVM and native MGS, TPM and Jedi Knight |
| Web console | esp-cpp.github.io/esp-box-emu | esp-cpp.github.io/tab5-emu |
References and Inspiration
Other NES emulators
- https://github.com/nesemu/NESemu
- https://github.com/NiwakaDev/NIWAKA_NES
- https://github.com/kanathan/plainNES
- https://github.com/blagalucianflorin/lbnes
- https://github.com/daniel5151/ANESE
- https://github.com/Grandduchy/YaNES
Other Genesis emulators
Useful background / information
- https://github.com/alnacle/awesome-emulators
- https://www.zophar.net/nes.html
- https://yizhang82.dev/nes-emu-overview
- https://www.gridbugs.org/zelda-screen-transitions-are-undefined-behaviour/
- https://bgb.bircd.org/pandocs.htm
- https://github.com/pebri86/esplay-gb
- https://github.com/hex007/esp32-gnuboy
- https://github.com/rofl0r/gnuboy
- https://github.com/zid/gameboy
- https://github.com/Jean-MarcHarvengt/MCUME
- https://github.com/OtherCrashOverride/go-play
- SNES signal reference
- NES signal reference
- Genesis signal reference
- DIY Game Boy
License
This project is licensed under the terms in LICENSE.
Questions
What is esp-box-emu?
esp-cpp/esp-box-emu is a public repo on GitHub by esp-cpp. Star Wars: Dark Forces, Doom, NES, Gameboy/Color, Sega Master System / GameGear, Sega Genesis / MegaDrive, and MSX I/II Emulators running on ESP BOX and ESP BOX-3 with a custom gamepad.
Is esp-box-emu open source?
It declares the MIT license on GitHub.
Does esp-box-emu run on macOS, Windows or Linux?
Its maker tagged it for macOS, Windows and Linux, or as Docker or cross-platform. That is declared by the maker; Take My Repo has not tested it.
How do I install esp-box-emu?
Open "Take it" on its page: Take My Repo writes an install plan for your machine and hands it to your AI agent (Claude Code, Codex or Cursor), which asks you before each step. Take My Repo has not tested it on any machine.
Is esp-box-emu still maintained?
Its last change on GitHub was on 2026-11-22. GitHub counts 2 open issues and pull requests. Take My Repo does not judge from that whether it is maintained.