Pi-Bolt
⚡ Pi, the coding agent, compiled ahead of time to one native executable. 10× faster to start, 7× less CPU and 4.5× less memory than Pi on Node. Linux, macOS, Windows, ARM64 and Android (Termux).
- 859
- TypeScript
- MIT
- 6 h ago
Learn a Angular Command Line Interface a Command Line tool/utility helps to create Angular Project-application scaffolding, structure, and many core building blocks of Angular application like Components, Services, Directives, Routing and Navigation, Pipes, Modules, etc. in no time-on the fly.
Repo dinanathsj29/angularcli-angualr-cli-tutorial, read from GitHub 1 d ago. dinanathsj29 has not joined Take My Repo.
dinanathsj29/angularcli-angualr-cli-tutorial is a public repo on GitHub by dinanathsj29. Learn a Angular Command Line Interface a Command Line tool/utility helps to create Angular Project-application scaffolding, structure, and many core building blocks of Angular application like Components, Services, Directives, Routing and Navigation, Pipes, Modules, etc. in no time-on the fly. It declares no license on GitHub. Public does not mean open source: without a license, nobody is granted the right to reuse it. It has 2 stars and last changed on 2019-08-02. Nobody has reviewed it on Take My Repo yet, which says nothing about its quality. Read from GitHub on 2026-11-21.
Hi All, I'm Dinanath Jayaswal, Senior UI/Web Developer and Adobe Certified Expert Professional, I wanna welcome you to Angular CLI step by step guide from basics to advanced. This Angular CLI Tutorial will help you to understand:
This Course/Tutorial is ideal for:
This course/Tutorial is for anyone and everyone, Almost everyone! Fresher/Newcomer as well as experienced UI/frontend/Web Developers who are interested in boost skills and further career in Angular world - by learning new latest dynamic tools/utilities which helps to scaffold Angular application to become a hi-tech developer.
Angular - Angular is one of the most widely used JavaScript framework used to create scalable, enterprise, and performant client-side web applications. It provides an ecosystem for the development of client-side web applications. The ecosystem for development may include external tools or libraries as well. The ecosystem process includes project bootstrapping, development operations/tools, testing, and build support. One of the best features of Angular framework is that it is quite flexible when it comes to the usage of external libraries apart from the scalability it provides. With Angular framework adoption being high, performance management of the application is community-driven indirectly driving better job opportunities.
Angular CLI - Creating Angular application boilerplate manually is tedious, time-consuming monotonous and laborious. Angular CLI helps to create required Angular application/project scaffolding chunks accurately with Google standards and in no time with ease.
After completing/attending this Course/Tutorial, participants should be able to:
Angular CLI = Angular Command Line Interface, its Command Line utility for Angular (website: https://cli.angular.io/)Angular CLI (Command Line Interface)Components, Services, Directives, Routing and Navigation, Pipes, Modules, etc. with best practices, quicker and easierAngular CLI is Angular command line tool helps to:
Components, Services, Directives, Routing and Navigation, Pipes, Modules, etc.Creating Angular application boilerplate manually is tedious, time-consuming, monotonous and laborious task - it trends to many mistakes. CLI helps to create required angular chunk accurately in no time on the fly. No doubt Angular CLI, will greatly help us improve our productivity with best Angular practices.
Angular CLI eases and makes Angular app/project development process faster.
| without Angular CLI | with Angular CLI |
|---|---|
| We have to do the setup manually: 1. download zip/executable/library files, 2. extract 3. follow specific installation process add and 4. edit framework/library configuration files etc. according to the project and requirements |
Just install/setup Angular CLI globally on the machine, generate/create new project by using Angular CLI commands and get started with app in no time |
In this section, we will list/understand the different tools/Softwares/utilities required to set up a local development environment of Angular CLI.
Node, (website: https://nodejs.org/en) NPM, (Node Package Manager - comes inbuilt with Node)Angular CLI = Command Line Interface, Angular CLI (Command Line Interface) for angular (website: https://cli.angular.io/), Text EditorIn this section, we will learn how to set up a local development environment of Angular CLI to start developing Angular apps with Angular CLI.
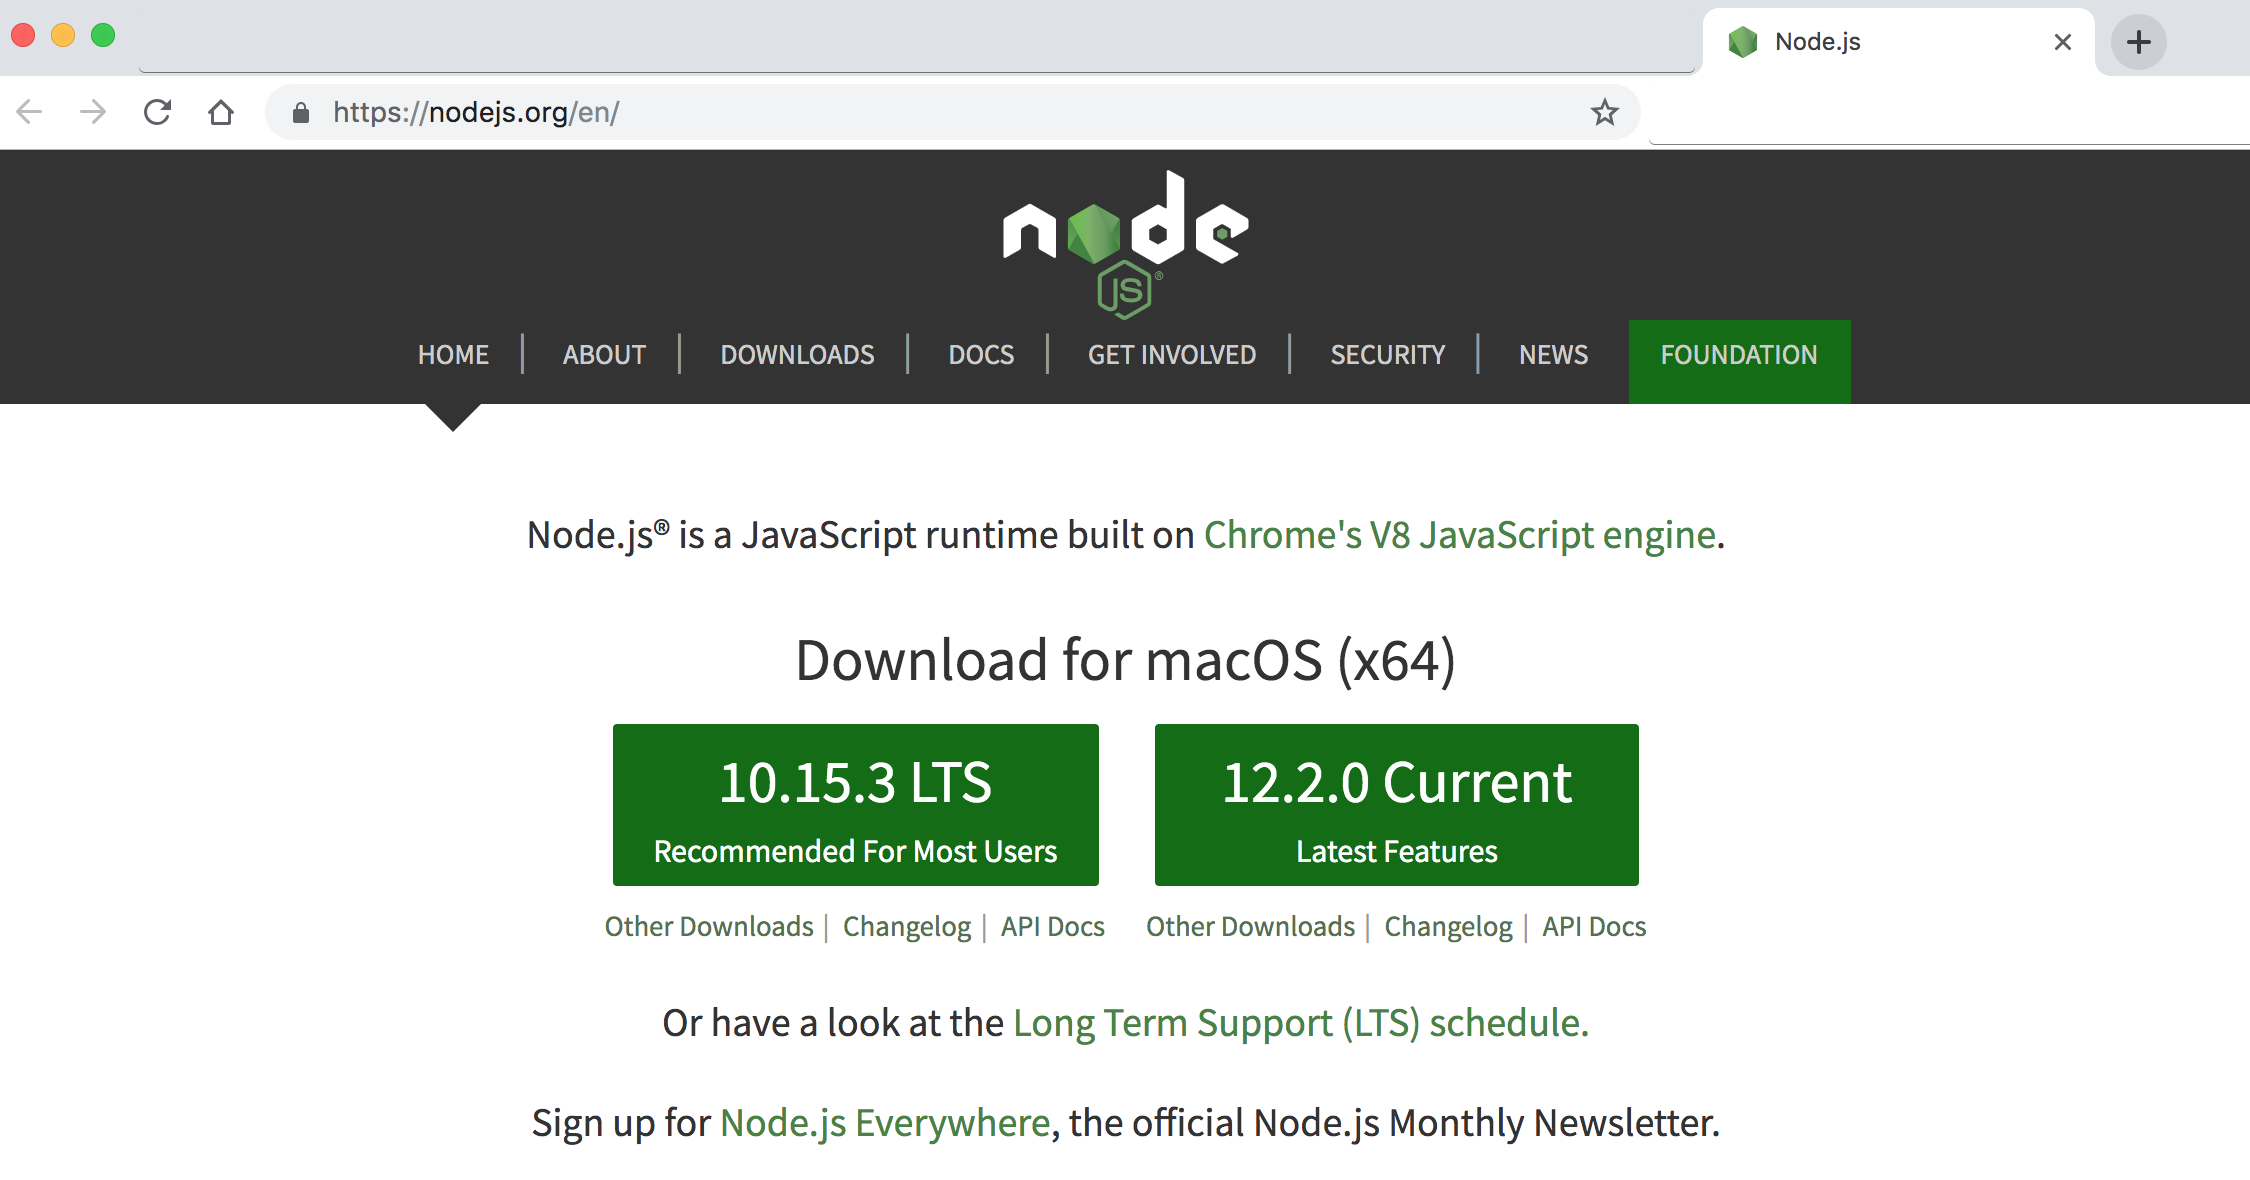 Image - Nodejs website - https://nodejs.org/en
node -v / node --version OR npm -v / npm --versionnpm install -g @angular/cli OR npm i -g @angular/cli (it will install Angular CLI globally (-g))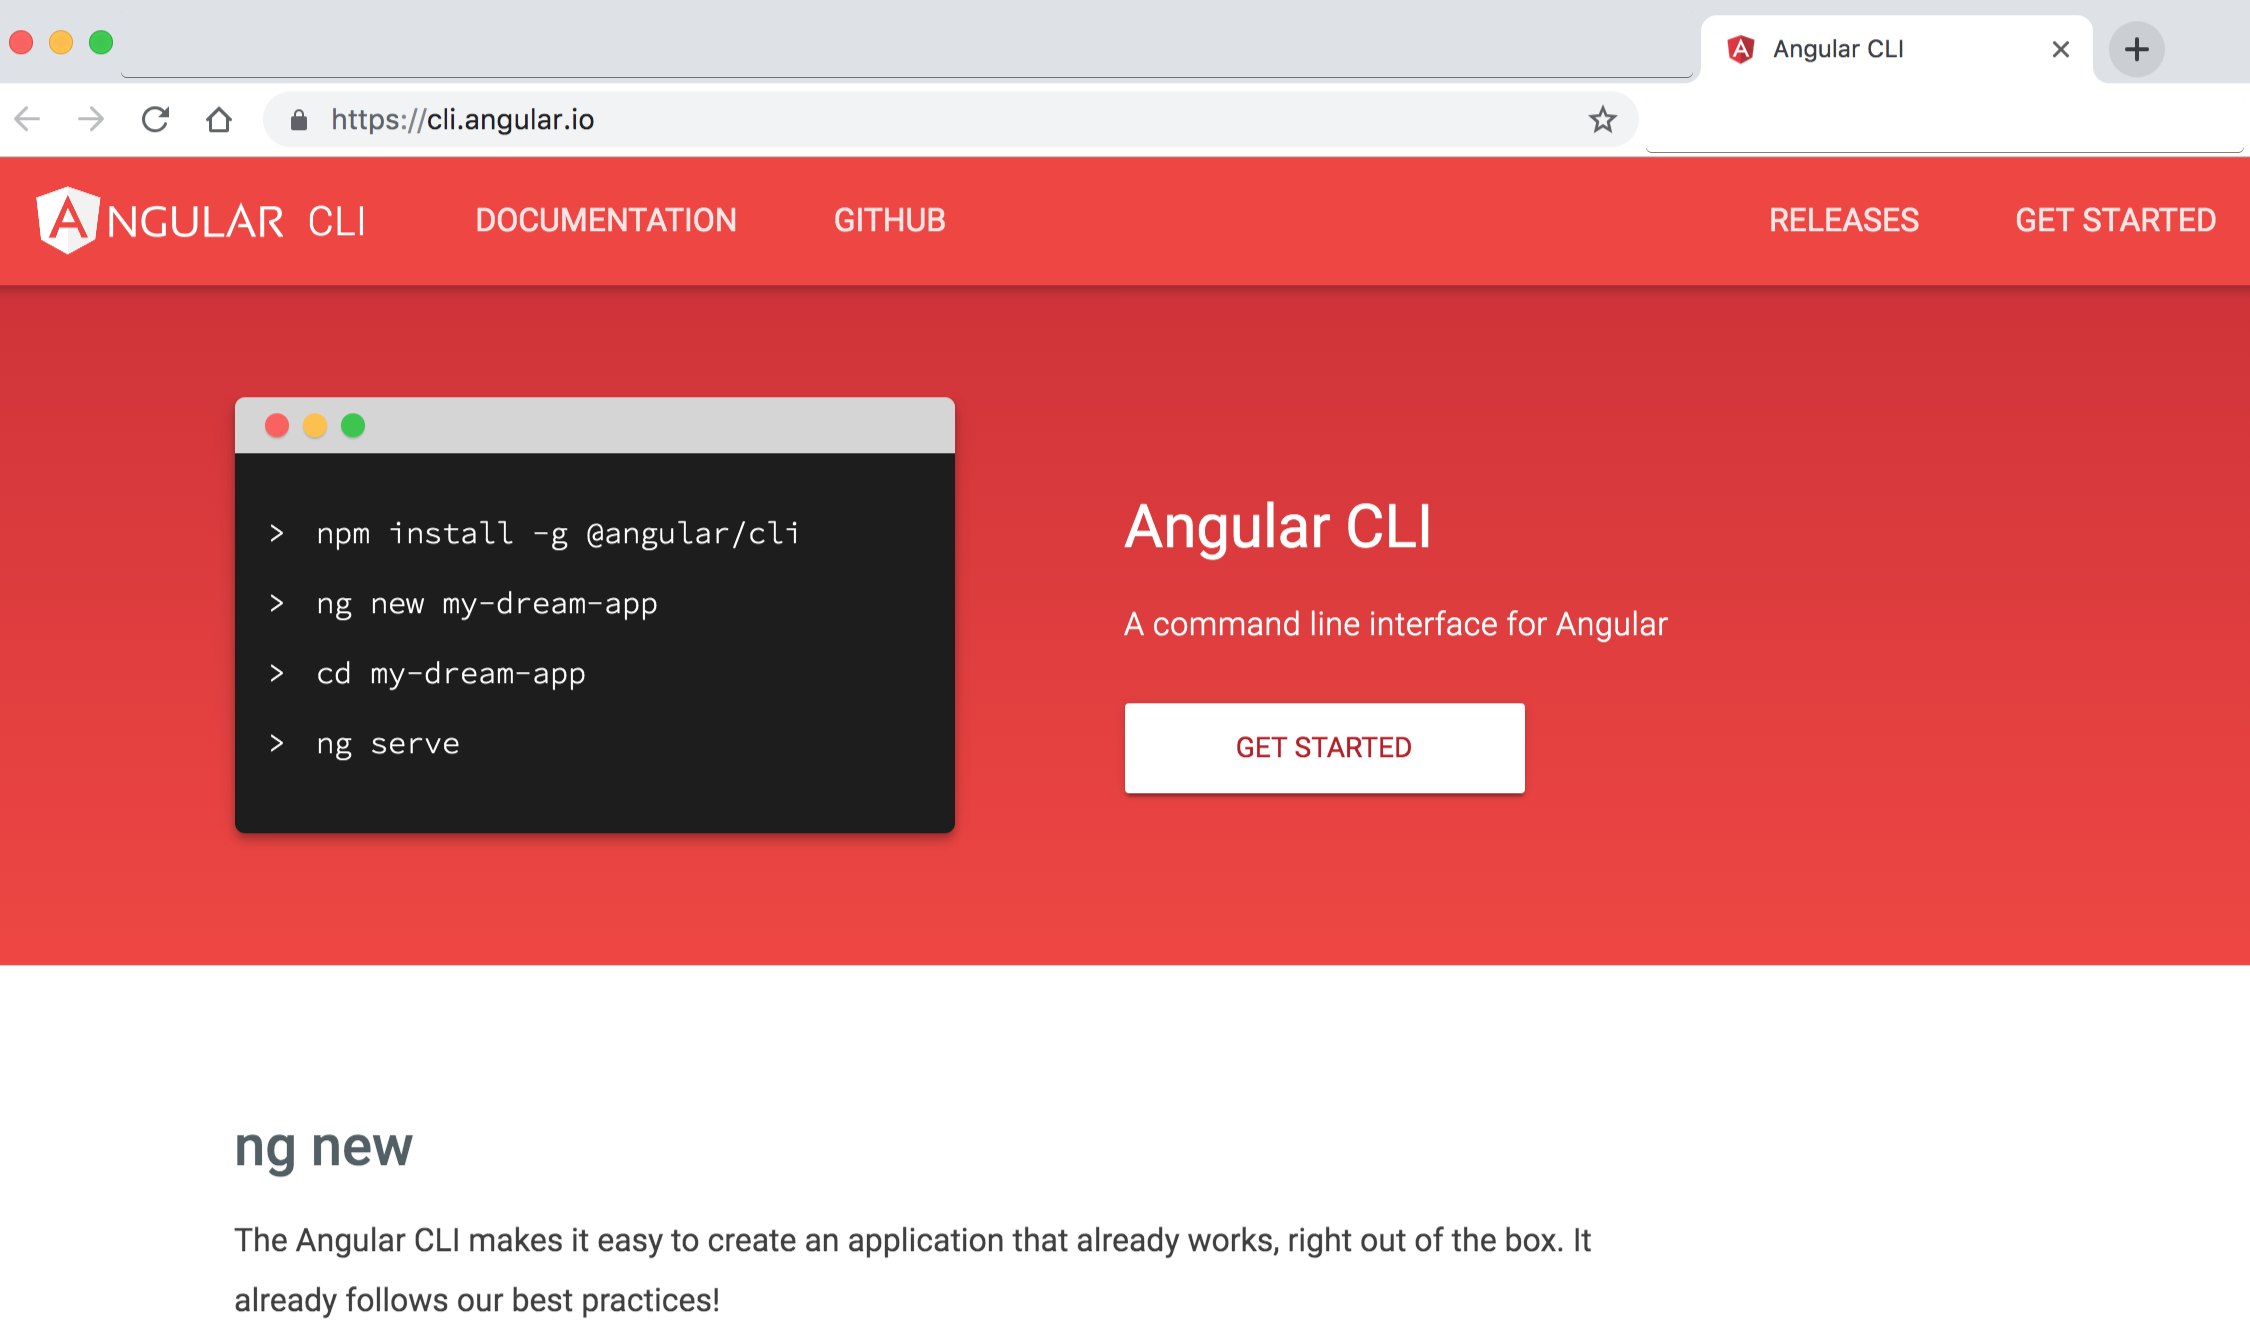 Image - Angular CLI website - https://cli.angular.io/
ng -v OR ng --version (the command returns versions of Angular CLI, node/npm as well as operating system installed on your local machine), you can also verify Angular CLI installation by command: ng -h OR ng --helpng newng new project/appName
example: command: ng new firstAngularCliApp
- Create an Angular application that already works, right out of the box with our best practices!
- Creates a new Angular project. By default the project is created under the current directory itself
'ng new' command do following:
- Creates a new folder with the name firstAngularCliApp
- All the npm dependencies are installed in node_modules folder
- All the required configuration and source files are created
- Unit and end-to-end tests are created
- Karma unit test runner is configured
- Protractor end-to-end test framework is configured
2. Go inside the project/app directory or change directory, command: cd firstAngularCliApp
3. Build, compile, serve, check and run Angular App in default browser by using Angular CLI command: ng serve OR ng serve -o OR ng serve --open
4. To change default port number, syntax: ng serve --port PORN NUMBER
example: command: ng serve --port 4500
5. Go to the browser and launch/check Angular App by entering the web address: localhost:4200 OR localhost:4500
Angular CLI application runs in watch/live reload mode which simply means when you make any changes in application files and perform save, browser/app refresh and load the latest code automatically.
| Angular CLI new command option | Description |
|---|---|
| ng new app-name --dry-run ng new app-name --dryRun ng new app-name -d |
Run through without making any changes, --dry-run flag shows/lists all files/folders that would have been created/generated when using/running ng new ( just a mock/dry run of ng new command ) |
| ng new app-name --skip-install ng new app-name --skipInstall ng new app-name -si |
When true, does not install dependency packages i.e. node_modules folder |
| ng new app-name --skip-tests ng new app-name --skipTests ng new app-name -st ng new app-name -S |
does not generate "spec.ts" test files for the new project |
| ng new app-name --inline-style ng new app-name --inlineStyle ng new app-name -is ng new app-name -s |
When true, includes styles inline in the component .TS file itsleft (No seperate .css/scss styles files created). By default, an external styles file is created and referenced in the component .TS file. |
| ng new app-name --inline-template ng new app-name --inlineTemplate ng new app-name -it ng new app-name -t |
When true, includes template inline in the component .TS itsleft (No seperate .html template files created). By default, an external template file is created and referenced in the component .TS file. |
| Angular CLI command | Description |
|---|---|
| ng new app-name | To create new angular app/project |
| ng build | To build and create distributable/shareable version |
| ng serve | To run/serve angular app |
| ng serve --open OR ng serve -o | To run/serve angular app in default browser |
| ng lint | To run lint/syntax checker |
| ng test | To run unit test |
| ng e2e | To run End-to-End test |
Reference: https://angular.io/cli/new
ng help OR ng -hTo get the help of Angular CLI commands use ng help OR ng -h command, it lists available Angular CLI commands and their short descriptions
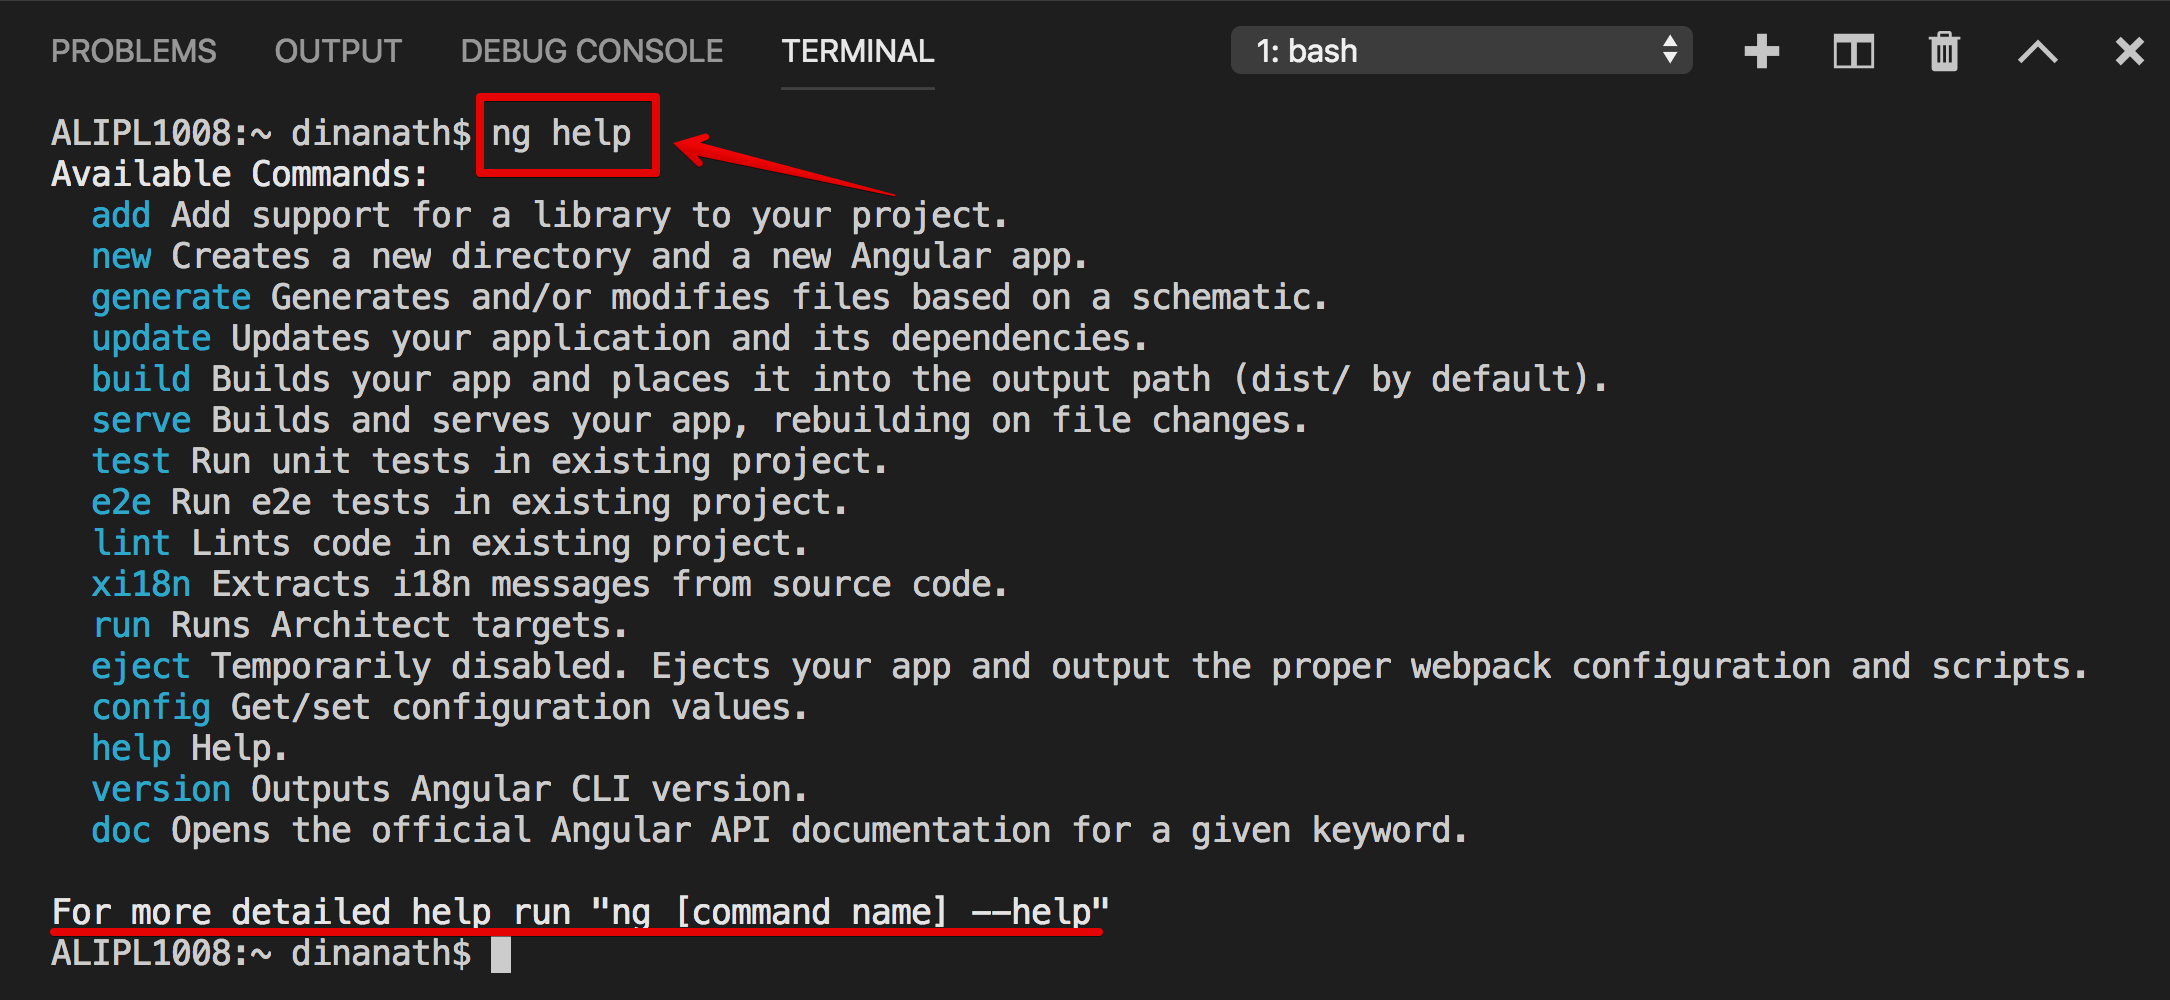 Image - Angular CLI Help
| Angular CLI command | Description |
|---|---|
| ng help OR ng -h | To get Angular CLI help |
| ng version --help | To get command-specific help |
| ng --help > fileName ng --help > help.txt OR ng --help > readme.doc |
To paste help content text to an external file, to redirect help command output to desired file |
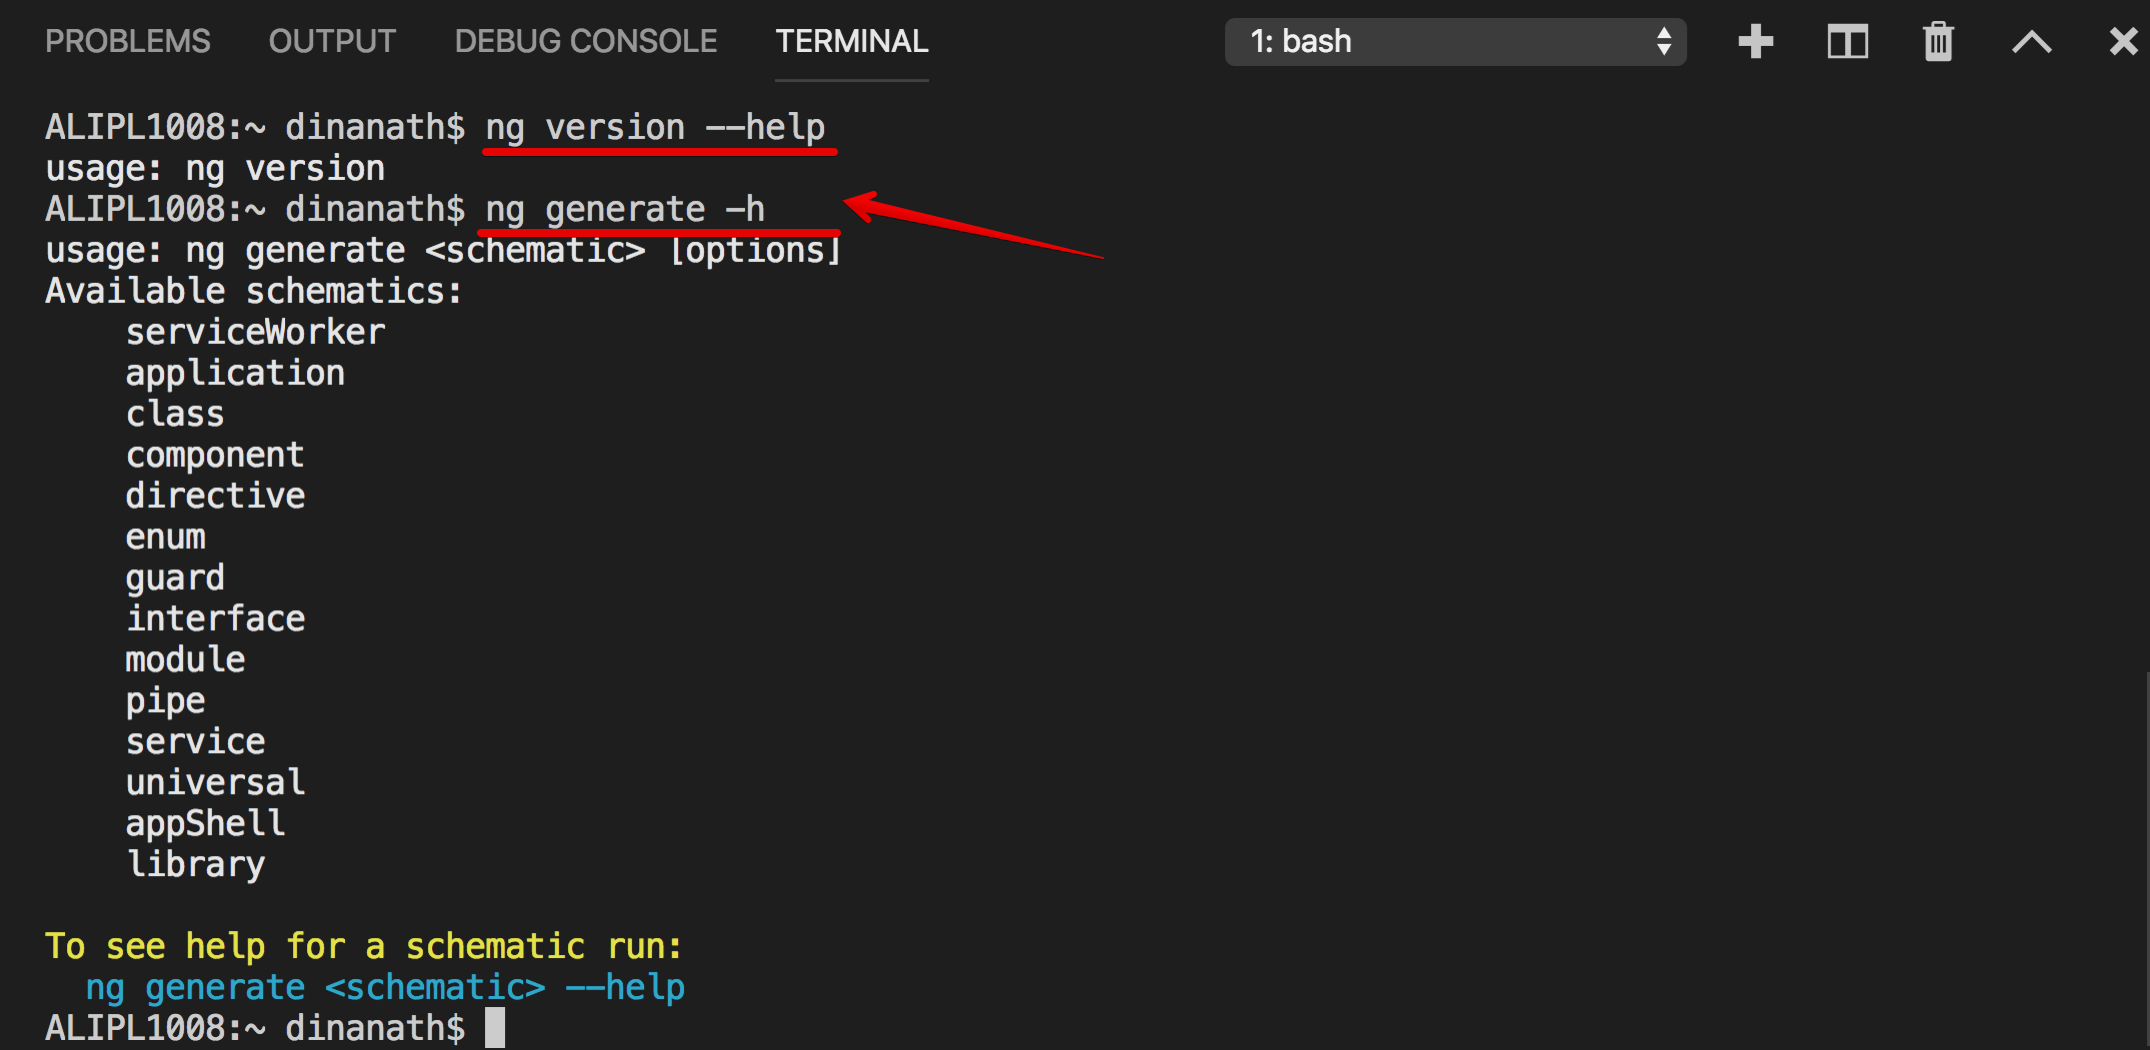 Image - Angular CLI - Command specific Help
Reference: https://angular.io/cli/help
In this section, we will discuss the significance and importance of the Angular CLI configuration file ( older angular versions 2/4/5 = .angular-cli.json, in latest angular version 6/7/8 = configuration file named as angular.json )
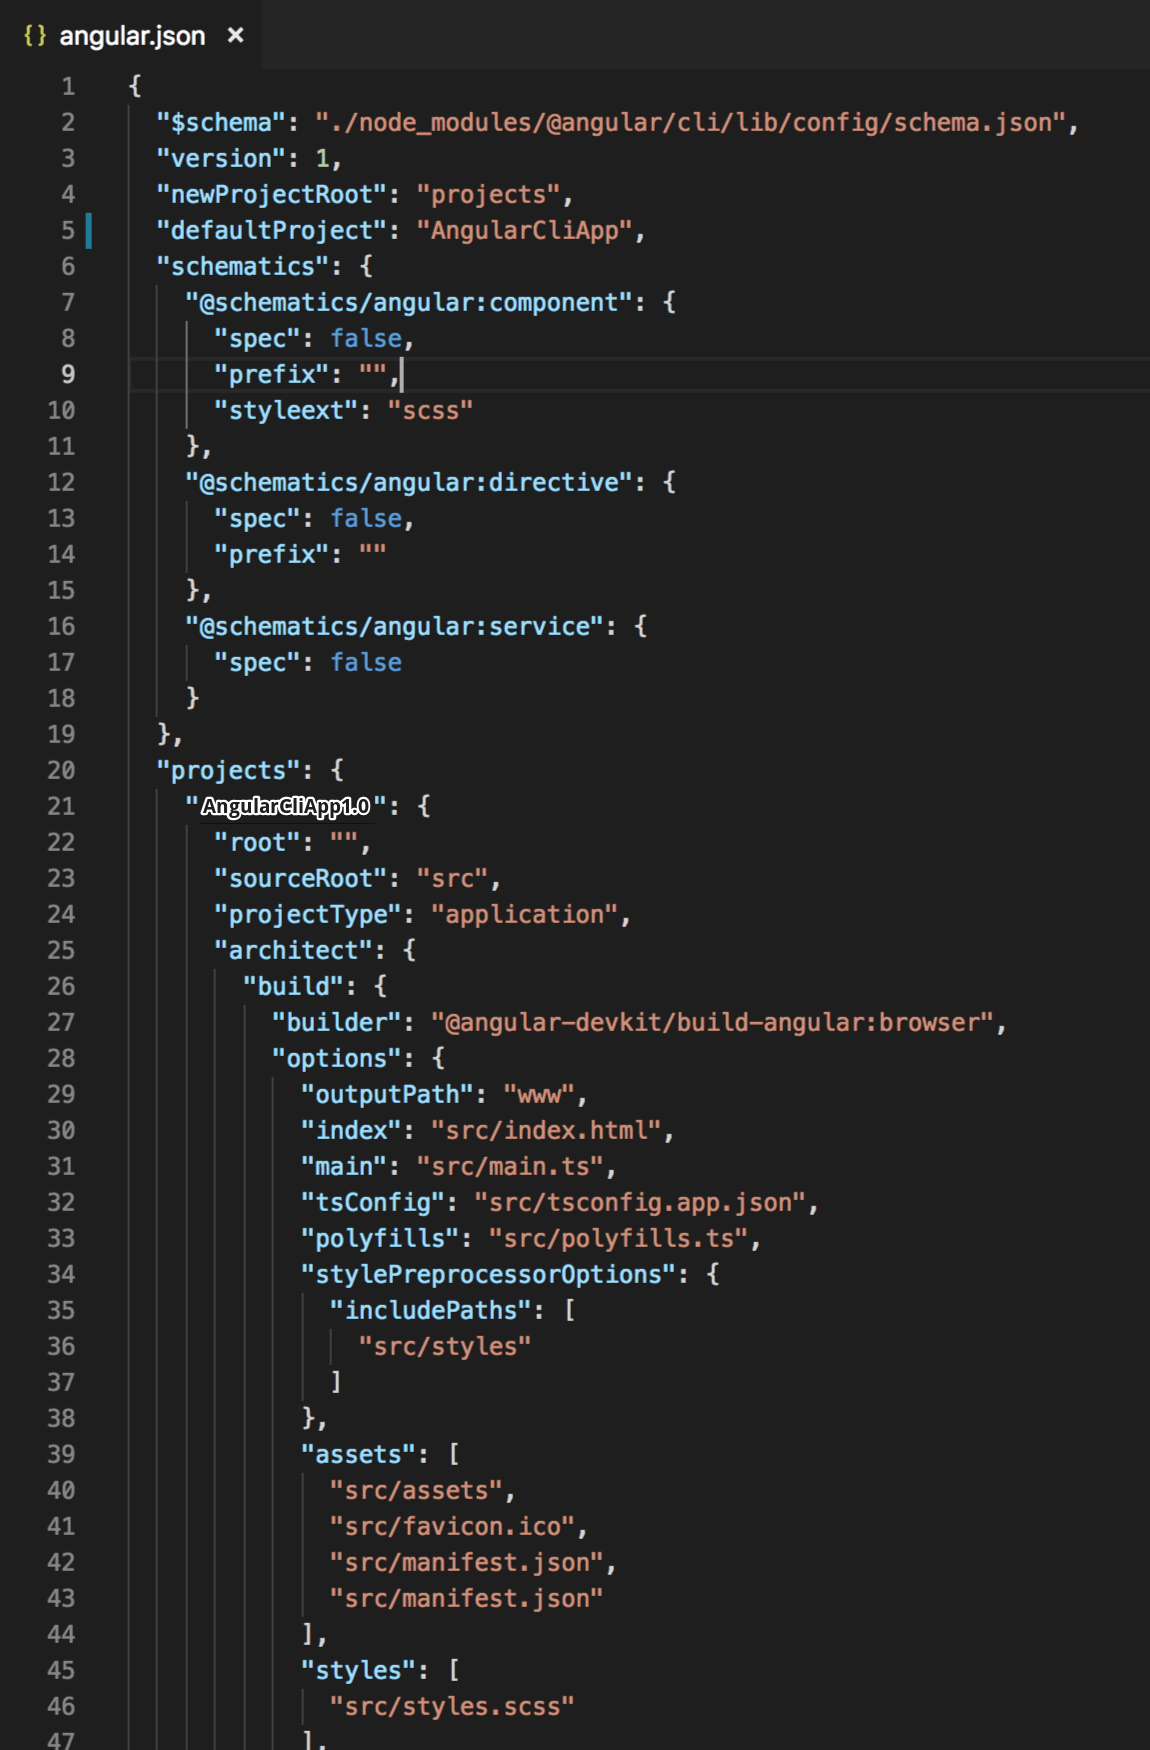 Image - Angular CLI - configuration json file - angular.json
| Setting | Purpose |
|---|---|
| default project | Name of the project |
| projects: root/sourceRoot | The root directory of the application, default is src |
| projects: outputPath | The output directory for build results, default is dist |
| projects: assets | List of application assets that you want to copy when building your project. By default, the src/assets/ folder and src/favicon.ico are copied over |
| projects: index | The name of the start HTML file which is by default index.html |
| projects: main | The name of the main entry-point file, which is main.ts by default |
| projects: tsConfig | The TypeScript configuration file |
| projects: polyfills | The name of the polyfills file - provides polyfill scripts for browser support. Angular is built on the latest standards of the web platform. Targeting such a wide range of browsers is challenging because not all browsers support all features of modern browsers. This can be compensated by using polyfill scripts that implement missing features in JavaScript |
| projects: styles | Global styles to be included in the build, default is styles.css. We can also use less or scss. To change to less or scss/sass, use the "style" option when generating a new angular project using the "ng new" command |
Reference: https://angular.io/guide/workspace-config
The following Angular CLI command creates a new working Angular Project skeleton/scaffolding and structure with best practices and standards:
ng new firstAngularCliAppThe below image shows an Angular project file folder structure in Visual Studio Code editor:
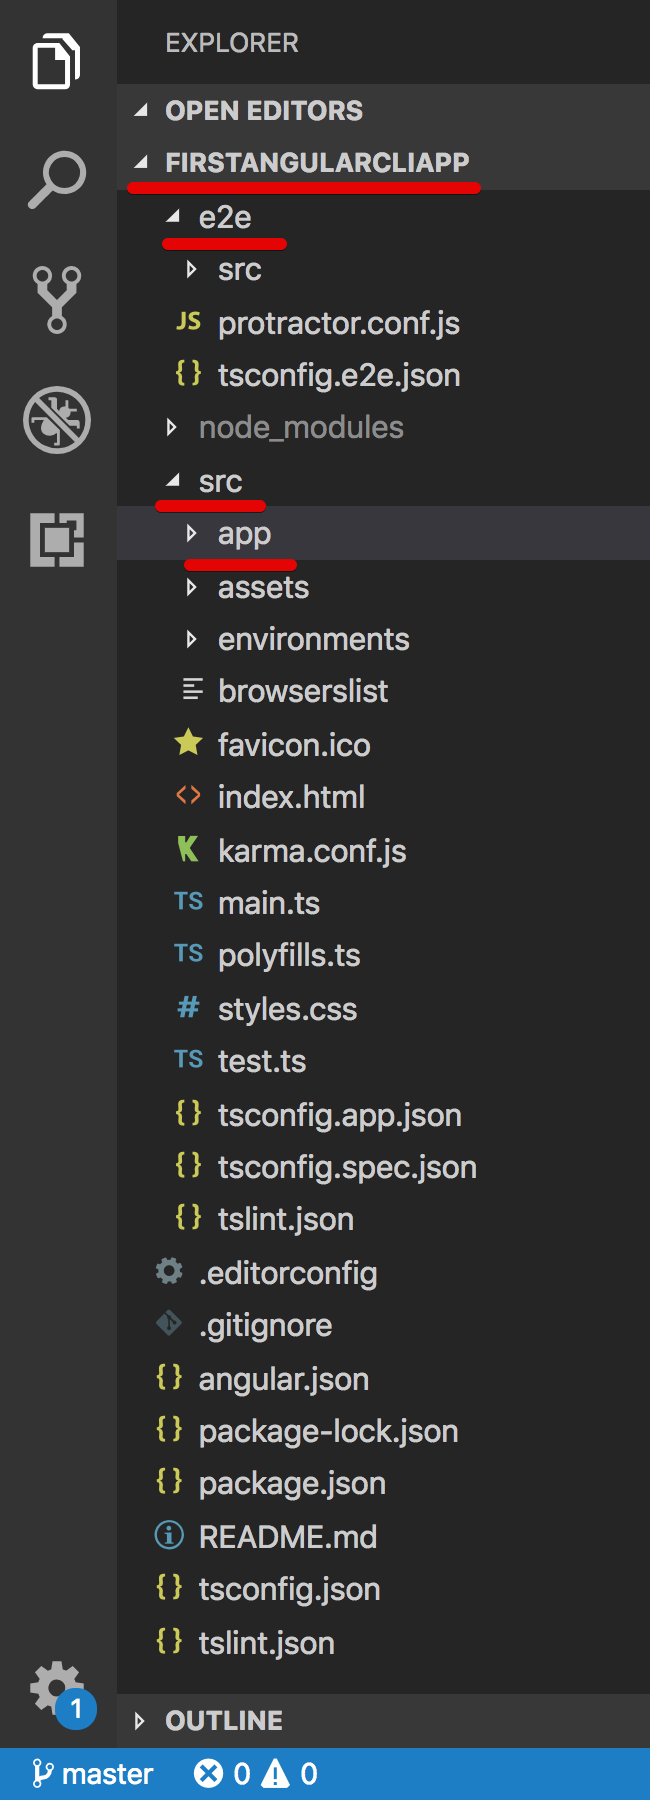 Image - Angular CLI - File Folder Project Structure - Root
| Angular CLI command | Description |
|---|---|
**Folders:** |
|
| e2e | An e2e folder contains source files for a set of end-to-end tests along with test-specific configuration files |
| node_modules | The packages specified in package.json file are installed into this folder when we run npm install command. Also provides npm packages/dependencies to the entire workspace/projects |
**Files:** |
|
| .editorconfig | Configuration for current code editors. This file let you set certain code style guidelines, example: what indent_style, spaces or tabs, indent size etc. We can share this editorconfig file with other developers/team members to maintain consistent coding styles. Read more about editor configuration please visit http://editorconfig.org |
| .gitignore | Specifies intentionally untracked files that Git should ignore. This file is used to determine files and folders you don't want to check-in/track to source control, example: dist, backup, node_modules folder |
| angular.json | Angular CLI configuration file. Angular CLI configuration defaults for all projects - build, serve, and test tools that the CLI uses, such as TSLint, Karma, and Protractor |
| package-lock.json | Provides version information for all packages installed into node_modules by the npm client |
| package.json | Contains the packages to build and run our angular application. Custom script can also be added in as per requirements It contains two sets of packages: 1. dependencies: The dependencies are essential for running the application, and 2. devDependencies: The devDependencies are only required to develop the application These packages mentioned in package.json are installed into the node_modules folder by the Node Package Manager (npm), when npm install command is executed."scripts" property contains the useful npm commands, just look we have "start": "ng serve" or "start": "ng serve --open" |
| README.md | Introductory documentation (project documentation) for the root Angular app. README.MD (MarkDown) file contains the commonly used Angular CLI commands to build, run and test app |
| tsconfig.json | The TypeScript configuration settings file. For example compileOnSave, sourceMap (.map files are used for debugging your application) |
| tslint.json | Configuration file for linting and syntax checking (checks our TypeScript code for programmatic and stylistic errors as well as non-adherence to coding standards and conventions) |
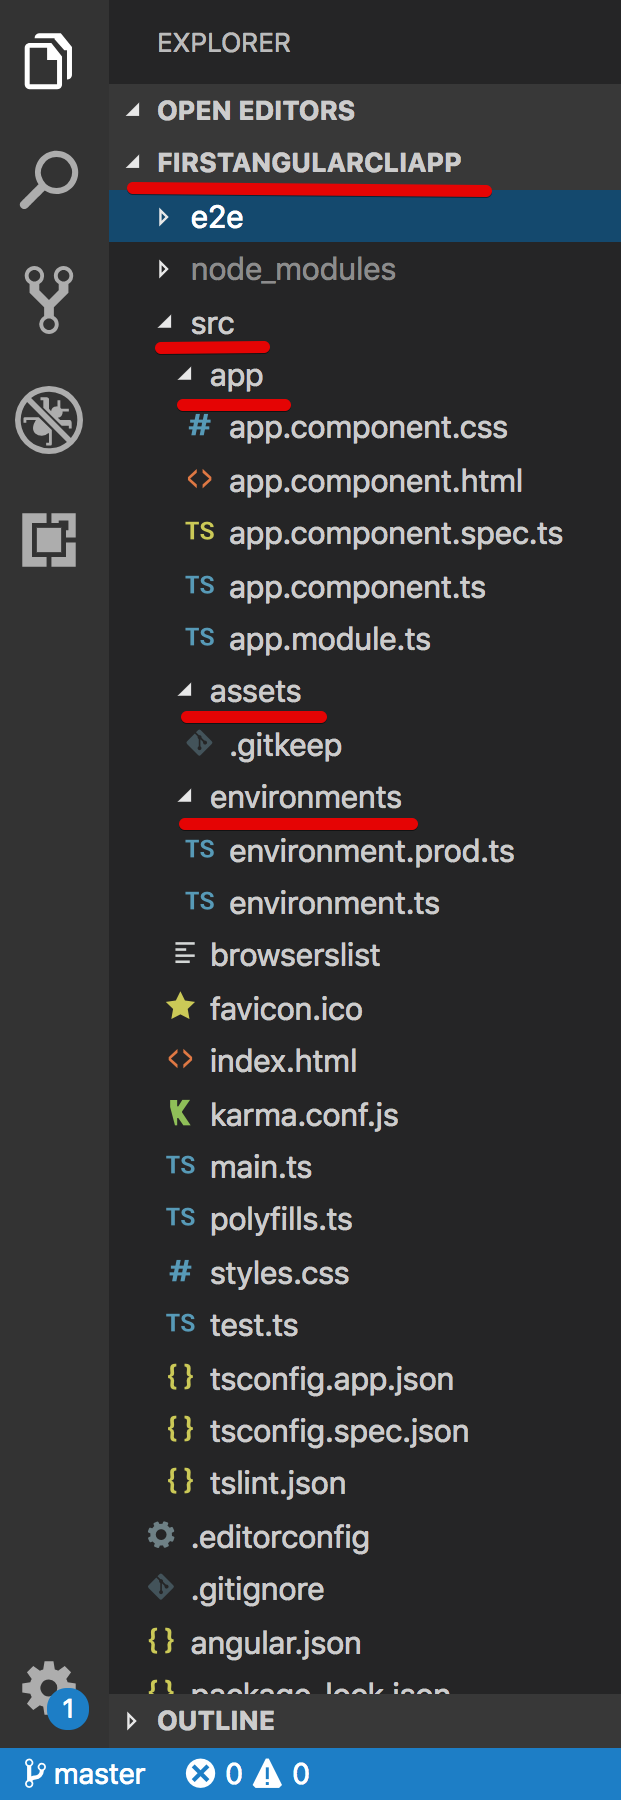 Image - Angular CLI - File Folder Project Structure - src folder
| Angular CLI command | Description |
|---|---|
**Folders:** |
|
| src | By default, the ng new CLI command creates a new application skeleton in an src/ folder (Source files/source code for the root-level angular application project - Components, templates, pipes, services, images, styles, etc that our angular application needs are present) |
| app | Contains the component files in which your application logic and data are defined. It contains main bootstrap/startup/initializer component named 'app component' and module named 'app module' |
| assets | Contains the various assets of your application like images and anything else to be copied when you build your application |
| environments | Contains build configuration options for particular target environments i.e. By default there is an unnamed standard development environment and a production ("prod") environment. You can define additional target environment configurations as per requirements like Dev, QA, UAT, PROD, etc. |
**Files:** |
|
| browserslist | Contains various browser list used by autoprefixer to adjust CSS support |
| favicon.ico | An icon (favorite icon) use for this application in the bookmark bar/browser address bar/title bar |
| index.html | The main HTML page that is served/shown when someone visits your site/application/project. The CLI automatically adds all JavaScript and CSS files when building your app |
| karma.conf.js | Karma - the unit test runner configuration file |
| main.ts | The main entry point for the Angular application, it contains the code to bootstrap the application root module (AppModule) |
| polyfills.ts | The name of the polyfills file - provides polyfill scripts for browser support. Angular is built on the latest standards of the web platform. Targeting such a wide range of browsers is challenging because not all browsers support all features of modern browsers. This can be compensated by using polyfill scripts that implement missing features in JavaScript |
| styles.css/styles.scss/styles.sass | Contains the global styles of our application. Note: Styles that are local and specific to a component are often defined within the component itself for easier maintenance |
| test.ts | The main entry point for unit tests and loads all the .spec and framework files. This file is required by karma.conf.js and loads recursively all the .spec and framework files (You don't typically need to edit this file) |
| tsconfig.app.json | TypeScript compiler configuration for the Angular app |
| tsconfig.spec.json | TypeScript compiler configuration for the unit tests |
| app.component. {.ts,.html,.css,.spec.ts} | The root/main component (AppComponent) TypeScript, HTML template, StyleSheet and Spec files |
| app.module.ts | Root application module (AppModule) |
Reference: https://angular.io/guide/architecture Reference: https://angular.io/guide/file-structure
An angular application must have the npm packages installed to be able to generate components using Angular CLI. Example: ng generate component COMPONENT-NAME OR ng g c COMPONENT-NAME
| Angular CLI command | Description |
|---|---|
| ng generate component COMPONENT-NAME OR ng g c COMPONENT-NAME |
Creates a new generic component definition |
| ng generate component PATH/COMPONENT-NAME OR ng g c PATH/COMPONENT-NAME |
Place the generated component folder in a specific/different folder |
| ng generate component COMPONENT-NAME --flat OR ng g c PATH/COMPONENT-NAME --flat |
Generating/create a new component without a folder, To generate component on root / without folder name / not inside component folder name |
| ng g c COMPONENT-NAME --dryRun | Run through without making any changes, we can mock/dry run app, components or any other Angular CLI utilities |
| ng g c COMPONENT-NAME --skipTests | does not generate "spec.ts" test files for the new project |
Reference: https://angular.io/cli/generate
In Angular application services can be created by using Angular CLI command: ng generate service consumerData OR ng g s consumerData
than
register/import service in app.module.ts at the top, also in providers array/root injector.
| Angular CLI command | Description |
|---|---|
| ng generate service consumerData OR ng g s consumerData |
To create a new service |
In real-time project an Angular project may contain more than one module like loginModule, userModule, adminModule, superAdminModule, reportModule, studentModule, testModule, etc. AppModule is root module in the application.
Create a new module by using Angular CLI command: ng generate module admin OR ng g m admin
than
register/import newly created module in app.module.ts at the top, also in imports array.
| Angular CLI command | Description |
|---|---|
| ng generate module admin OR ng g m admin |
To create a new module |
ng generate module admin -m = app.module OR ng g m admin -m = app.module |
To import/register new admin module into the root module (AppModule) / under specific module (If multiple module present in app) |
Note: Generating directives, pipes, routing guards and other angular features are very similar to generating component and services.
| Angular CLI command | Description |
|---|---|
| ng generate directives DIRECTIVE-NAME OR ng g d DIRECTIVE-NAME |
To create a new directive |
| ng generate directives PATH/DIRECTIVE-NAME OR ng g d PATH/DIRECTIVE-NAME |
To create a new directive under a specific/different folder |
ng directives DIRECTIVE-NAME -m = app.module OR ng g m directives DIRECTIVE-NAME -m = app.module |
To import/register new directive into the root module (AppModule) / under specific module (If multiple module present in-app) |
| ng generate pipes PIPE-NAME OR ng g p PIPE-NAME |
To create a new pipe/filter |
| ng generate guard GUARD-NAME OR ng g g GUARD-NAME |
To create a new Guard |
Note: IF multiple modules are present in Angular app than generate directives, pipes or component with following commands:
deprecated)Note: We can use the Angular CLI to generate TypeScript features as well. Generating class, interface, enum, and other angular features are very similar to generating component and services.
| Angular CLI command | Description |
|---|---|
| ng generate class CLASS-NAME OR ng g cl CLASS-NAME |
To create a class |
| ng generate interface INTERFACE-NAME OR ng g I INTERFACE-NAME |
To create an interface |
| ng generate enum ENUM-NAME OR ng g e ENUM-NAME |
To create an enum |
ng lint command lint the application code using tslint to ensure best coding practices of Angular.
Angular and various Languages, Frameworks uses linters to check:
As far as Angular CLI project/app is concern tslint.json is the configuration file for linting. This file contains all the default rules for linting our code.
| Angular CLI command | Description |
|---|---|
| ng lint | Runs linting tools on Angular app code |
| ng lint --help OR ng lint -h |
To get help on ng lint command |
| ng lint --type-check OR ng lint --typeCheck |
If no-use-before-declare rule is true or enabled we need to use --type-check option, it controls the type check for linting |
| ng lint --fix | To fix common linting rules automatically by Angular CLI (automatic fix) |
There are many rules related to quotes, spaces, semicolon, keywords, etc. mentioned in tslint.json file, we can modify rules or follow them as per requirements.
| Angular CLI command | Description |
|---|---|
| no-var-keyword | If true, var keyword is not allowed to define any variables, instead, use let or cont keyword while defining any new variable in application |
| no-use-before-declare | If true, not allowed to use any variable before the declaration. The simple step is - 1. First Define variables 2. Then only Use variables |
| quotemark | The quotemark rule specifies whether you want single or double quotes |
| no-trailing-whitespace | This rule disallows trailing whitespace at the end of a line |
| semicolon | Rule specifies that a line should be terminated with a semicolon |
| comment-format | It specifies that all single-line comments must begin with space |
| component-class-suffix | This rule enforces that a component class should end with the suffix keyword Component |
| use-life-cycle-interface | It denotes we must add the implements keyword for every lifecycle hook used (export class AppComponent implements OnInit...) |
Reference: https://angular.io/cli/lint
Let's discuss, How to display and fix linting errors in Visual Studio Code / Visual Studio Code Insiders. By default Visual Studio Code (VS Code) does not show/display any linting errors with red underline.
To check syntax error/lint error by default (as soon as we type code) in Visual Studio Code / Visual Studio Code Insiders we must need to install TSLint extention from menu VIEW->Extension Menu (SHIFT+COMMAND+X) or at left side panel -> click on the last extention icon -> and search for TSLint extention -> Reload VS Code to activate newly installed TSLint extention.
If any red underlines in code (if any linting errors exist in code) simply follow below-mentioned approaches to fix:
Fix lint error (Fix Missing/Fix...)Angular Router enables navigation from one view (component) to the other/next views (component) as users perform tasksng new routing-demo-app --routingng serveIn this section we will discuss and learn:
ng serveAngular CLI command to serve and run an angular application in default browser: ng serve --open
Note: Behind the scene and under the hood
Angular CLI runs Webpack to build and bundle all JavaScript and CSS code
(.html, .ts, .css/.scss/.sass, .spec.ts etc.)Web browsers have a limit on how many scripts or CSS files can download and run simultaneouslyapplications can suffer performance perspective and face performance issues, as many JS or CSS files to download, load and runBundling (concat and minify) can solve the downloading problem by combining small files into fewer bundles| **Angular CLI Bundle File ** | Description |
|---|---|
| main.js | All application code that the developer writes |
| polyfills.js | All polyfill scripts for browser support, Browser Polyfills |
| runtime.js (inline.bundle.js) | WebPack runtime & settings, required for Webpack to perform all its task |
| styles.js | All Styles (CSS style sheet) used in the application |
| vendor.js | All Angular and 3rd party vendor utility files |
ng serve command build, serve and creates different bundles as mentioned above. One can view bundle info and verify those all bundles while compiling/serving angular app by various ways as given below:Terminal / Command Window/Panel - ng serve --open --port 5000 Google Chrome Browser -> View menu -> Developer -> Developer Tool -> Elements Tab (at the bottom of body tag)Google Chrome Browser -> View menu -> Developer -> Developer Tool -> Soures TabGoogle Chrome Browser -> View menu -> Developer -> Developer Tool -> Network Tab - All (also get size information of bundle)Syntax & Example: 1.
Terminal / Command Window/Panel - ng serve --open --port 5000
  ng serve --open --port 5000
  ** Angular Live Development Server is listening on localhost:5000, open your browser on http://localhost:5000/ **

  Date: 2019-07-31T14:58:02.292Z
  Hash: e4a01629e300d6470f8a
  Time: 7233ms
  chunk {main} main.js, main.js.map (main) 145 kB [initial] [rendered]
  chunk {polyfills} polyfills.js, polyfills.js.map (polyfills) 227 kB [initial] [rendered]
  chunk {runtime} runtime.js, runtime.js.map (runtime) 5.22 kB [entry] [rendered]
  chunk {styles} styles.js, styles.js.map (styles) 16.6 kB [initial] [rendered]
  chunk {vendor} vendor.js, vendor.js.map (vendor) 3.62 MB [initial] [rendered]
  ℹ 「wdm」: Compiled successfully.
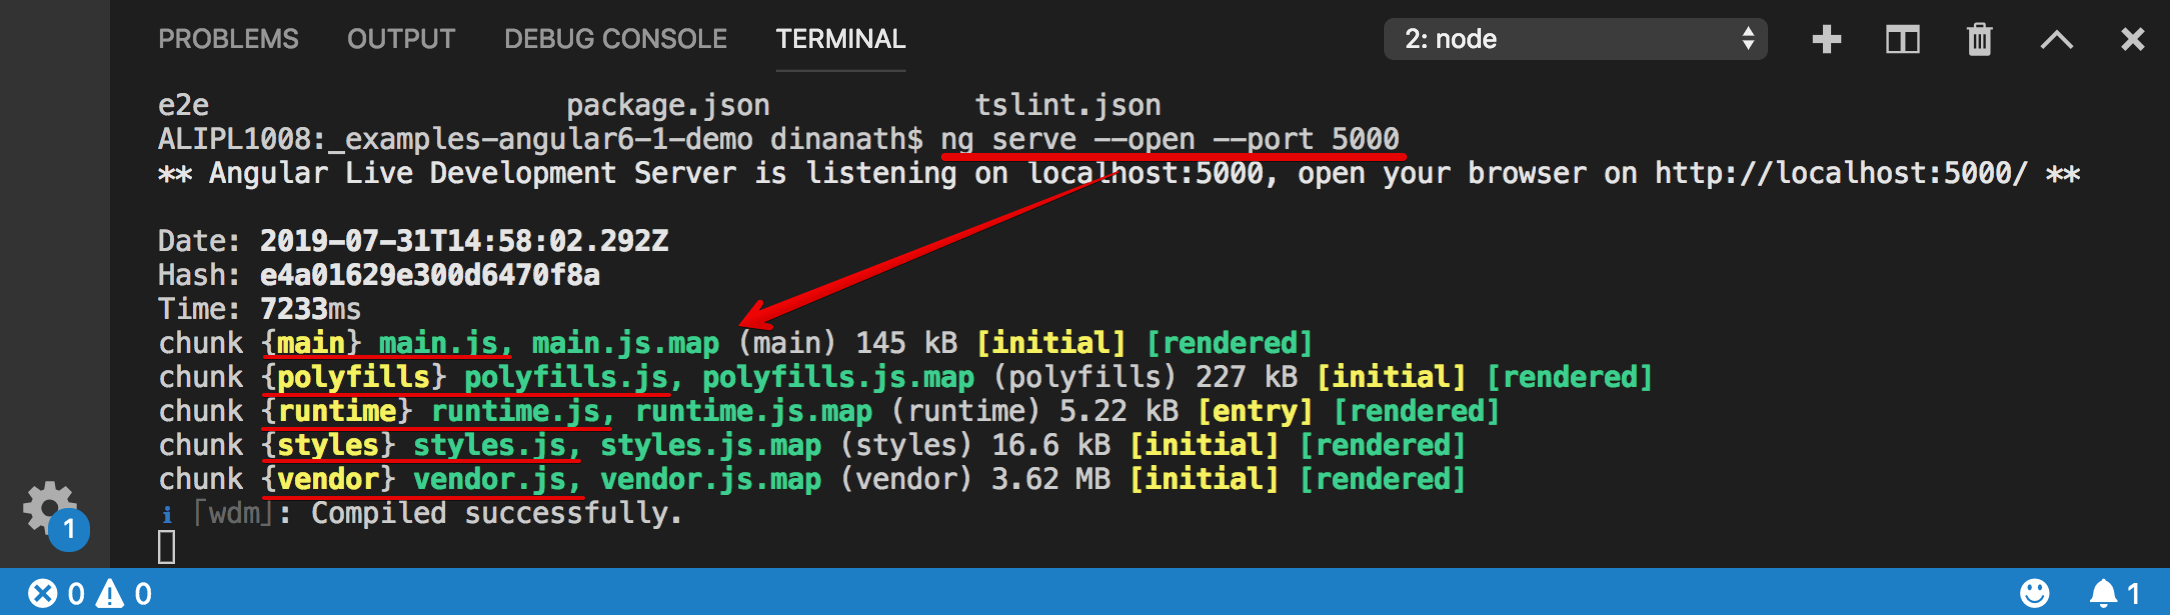 Image - ng serve terminal output
Syntax & Example: 2.
Google Chrome Browser -> View menu -> Developer -> Developer Tool -> Elements Tab
  <html>

    <head> </head>

    <body>

      <app-root> </app-root>

      <script type="text/javascript" src="runtime.js"></script>
      <script type="text/javascript" src="polyfills.js"></script>
      <script type="text/javascript" src="styles.js"></script>
      <script type="text/javascript" src="vendor.js"></script>
      <script type="text/javascript" src="main.js"></script>

    </body>

  </html>
 Image - ng serve browser elements tab output
Syntax & Example: 3.
Google Chrome Browser -> View menu -> Developer -> Developer Tool -> Soures Tab
 Image - ng serve browser sources tab output
Syntax & Example: 4. We can also check the different bundles loaded in Angular app from
Google Chrome Browser -> View menu -> Developer -> Developer Tool -> Network Tab - All
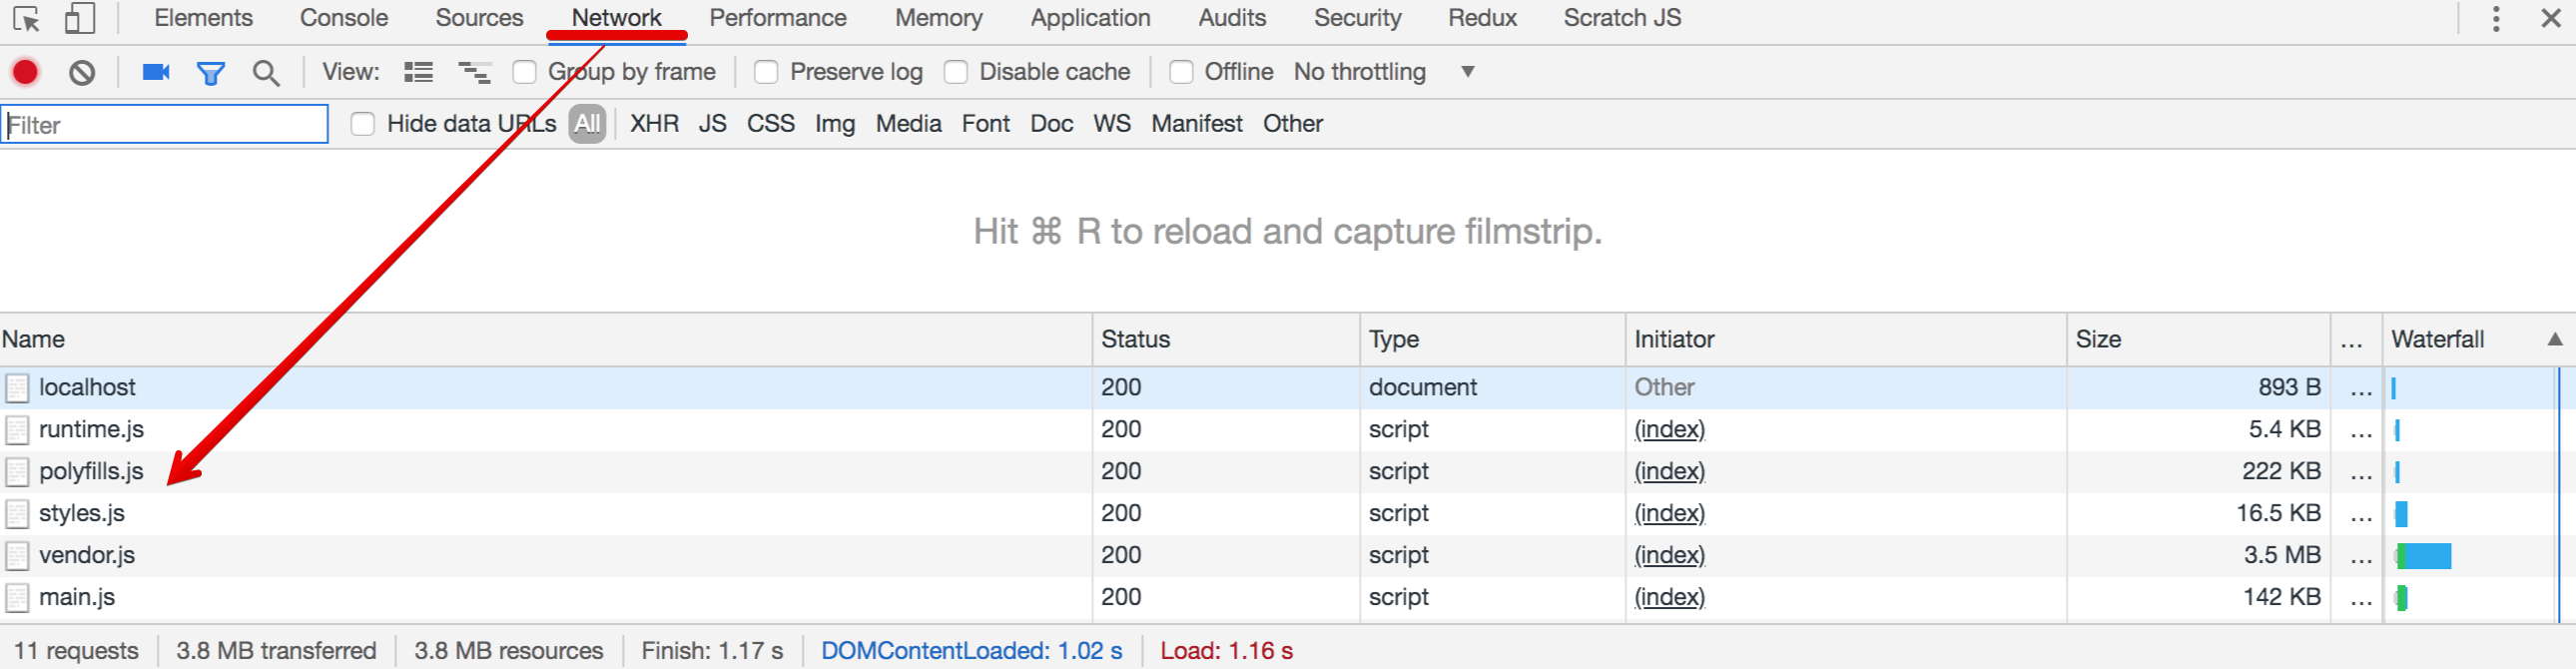 Image - ng serve browser network tab output
We know that Angular CLI command - ng serve is used to build, serve and run an angular application. To see and get the list of all options that we can use with ng serve command, one can use (--help) option i.e. try complete command as: ng serve --help
| Angular CLI command | Description |
|---|---|
| ng serve --help OR ng serve -h |
To get the help of ng serve command |
| ng serve --port OR ng serve -p |
To change the default port on which angular application is running i.e. 4200 |
| ng serve --open OR ng serve -o |
To open the served angular application/URL in default browser |
| ng serve --watch OR ng serve -w |
If true, Run the application build when any files change (keep having eye and keep watching any changes occurs) |
| ng serve ---live-reload OR ng serve -lr |
If true, Reload the application/page on any files change (automatically reload and refresh application in a browser if any changes taken place) |
| ng serve --extract-CSS OR ng serve -ec |
To Extract CSS from global styles into CSS files instead of js ones (instead of styles.js, bundle all CSS into styles.css) |
Note: To cancel watch / live reload mode use command:
ng serve --port 4500 --live-reload=false --watch=falseOR
ng serve --port 4500 --live-reload false --watch falseOR
ng serve -p 4500 -lr false -w false
Reference: https://angular.io/cli/serve
ng buildIn this section we will discuss and learn:
ng build must be executed from within a workspace directory to compile and create deployable build into an output directory named dist (distribution)ng build command creates/does a development build, not a production build (we can use ng build OR ng build --dev command). The development build is typically used for testing purpose. Also With a development build, it is easier to debug the application as it contains source map filesNote: As per the settings mentioned in file
angular.json(.angular-cli.json), with property"outputPath": "dist"("outDir": "dist"),ng buildcommands output directory is nameddist (distribution)
Reference: https://angular.io/cli/build
| ng serve | ng build |
|---|---|
ng serve - Compiles and serves the application from memory |
ng build - Build and Compiles the application to the "dist" (distribution) folder |
| ng serve command does not write the build files to the disk | ng build command creates and compiles all files into the "dist" (distribution) folder |
| ng serve command typically used to run the application on local development machine for viewing/testing purpose | ng build command typically used to create compiled version and deploy the application dist copy on another server |
| ng serve command cannot be used for deploying the build to another server (Testing, Staging or Production server) | ng serve command used for deploying the build to another server (Testing, Staging or Production server) |
| Feature Attribute Quality | Dev / Local / Normal build | Production / Prod build |
|---|---|---|
| Command | ng build OR ng build --dev command creates a Dev / Local / Normal build |
ng build --prod command creates a Prod / Production build |
| Creation | By default the ng build command creates/does a development build, specifically we can also use ng build --dev command |
We have to use specifically ng build --prod command to create a Prod / Production build |
| Purpose | The development build is typically used for testing purpose |
The Prod / Production build is created and used for final deployment purpose |
| Debug | Easier to debug as it contains source maps |
Not possible to debug as no source maps generated |
| Optimization | Development build are not optimized (not minified or treeshaked) |
A production build has all the performance optimization techniques like Ahead-of-time (AOT) compilation, minification, uglification, and tree-shaking |
| Bundle Size | Dev build bundle size is more/heavier as compared to prod build |
Production build bundle size is significantly less than Dev build bundle size |
| Optimization Techniques | Not optimised |
Performance optimization techniques like: Ahead-of-time (AOT) compilation, minification, uglification and tree-shaking used |
| Source Maps | Yes | No |
| Minifaction | No | Yes |
| Uglification | No | Yes |
| Tree Shaking | No | Yes |
| Extracts CSS | .js file | .css file |
| AOT | No | Yes |
| Angular CLI command | Description |
|---|---|
ng build --sourceMap OR ng build --source-map OR ng build -sm |
If true, generate build with source maps, Output sourcemaps |
ng build --prod --sourceMap true OR ng build --prod --source-map true OR ng build --prod -sm true |
To generate PRODUCTION build with source maps |
ng build --dev --sourceMap false OR ng build --dev --source-map false OR ng build --dev -sm false |
to avoid creation/generation of source maps in DEV build |
ng build --extractCss OR ng build --extract-css OR ng build -ec |
If true, Extract css from global styles into css files instead of js ones |
Reference: https://angular.io/guide/deployment
source map holds information about the original files and can be used to map the code within a compressed file back to its original position in a source file--sourcemaps option, an alias is -sm.js files whereas with the production build they are extracted to .css filesAngular offers two different models/modes/ways to compile your application:
| AOT | JIT |
|---|---|
| Ahead-of-Time Compilation | Just-in-Time Compilation |
| Command: ng build --aot | ng build OR ng build --dev |
AOT compilation compiles the application at build time before previewing into browser |
JIT compilation compiles the application in the browser at runtime |
| By default, with the prod build we get AOT compilation | By default, with the development build, we get JIT compilation |
| Tree Shacking, Minification, Uglication took place | No Tree Shacking, Minification, Uglication done here |
| Ahead-of-Time Compilation does not need/require angular compiler as AOT performs at build time | For Just-in-Time Compilation the browser needs to download the angular compiler |
With AOT compilation the angular application is pre-compiled and then loaded into the browser |
In case of JIt, at run-time, when a request is issued to the application, the JIT-compiler in the browser compiles the application code |
As AOT compilation the angular application is pre-compiled, user need not have to wait |
While the application is being JIT compiled in the browser, users have to wait |
With AOT the template binding errors will come to know at build time |
With JIT the template binding errors are only known at run time in browser |
Vendor bundle is lesser in size (as compilation is already done). By default, the production build is Ahead-of-Time compiled, So there is no need to bundle up the angular compiler code in the vendor bundle. This brings down the vendor bundle size by almost 50%. Also, its minified, uglified and tree-shaked so the bundler size is further reduced. |
Vendor bundle is heavy in size (as compilation is done at a later stage, the browser needs to download angular compiler). For Just-in-Time Compilation the browser needs to download the angular compiler which is roughly half size of Angular Framework and so Dev Build bundle is heavy in size |
| Ahead-of-Time Compilation | Just-in-Time Compilation |
Note: By default, the following 2 commands use JIT compilation
Note: We can use --aot option to turn on Ahead-of-Time compilation
Reference: https://angular.io/guide/aot-compiler
| Command | Example | Description |
|---|---|---|
| ng --help | ng --help OR ng -h | Getting Angular CLI help. Lists available Angular CLI commands and their short descriptions |
| ng generate --help OR ng --help version | Getting Angular on a specific command. Get help on generate and version command | |
| ng new | ng new <project-app-name> ng new firstAngularCliApp |
Creating New Angular Project/App. Create an Angular application that already works, right out of the box with our best practices! Creates a new Angular project. By default, the project is created under the current directory itself |
| ng serve | ng serve | Build and run the app (start the lite server). ng serve command builds an app and serve it locally, the server automatically rebuilds the app and reloads the page when you change any of the source files |
| ng serve --open OR ng serve -o | Open served app in default browser | |
| ng doc | ng doc <command> OR ng doc <keyword> | Getting online help of any given command. ng doc command opens the official Angular documentation (https://angular.io) in a browser, and searches for a given keyword |
| g doc version | This will open web page https://angular.io/api?query=version and shows appropriate documentation for version command | |
| ng generate | ng generate <component>/<service>/<directive>/<pipe> | Scaffolding of files/code inside angular project. Scaffolding/Generate Components, Services, Directives, Pipes, etc. with a simple command. The CLI will also create simple test shells for all of these |
| ng generate component Header OR ng g c Header | Generate component named header | |
| ng generate service data-service OR ng g s data-service | Generate service named data-service | |
| ng generate directive BlueHighlight OR ng g d BlueHighlight | Generate directive named BlueHighlight | |
| ng generate pipe odd-even-pipe OR ng g p odd-even-pipe | Generate pipe named odd-even-pipe | |
| ng version | ng -v OR ng version OR ng --version | Outputs Angular CLI/Node/NPM version |
| ng test | ng test | Runs all the unit tests in a project (all the unit test name like .spec.ts will run using karma/Jasmin) |
| ng e2e | ng e2e OR ng e | Builds and serves an Angular app, then runs end-to-end tests using Protractor from e2e folder of an angular app |
| ng lint | ng lint OR ng l | Run the codelyzer linter in an Angular project for analyzing the potential error in code line by line. Runs linting tools on Angular app code in a given project folder |
| ng build | ng build OR ng b | Compiles an Angular app into an output directory named dist/ at the given output path. Must be executed from within a workspace directory |
Reference: - https://angular.io/cli
Reference: - https://github.com/angular/angular-cli
dinanathsj29/angularcli-angualr-cli-tutorial is a public repo on GitHub by dinanathsj29. Learn a Angular Command Line Interface a Command Line tool/utility helps to create Angular Project-application scaffolding, structure, and many core building blocks of Angular application like Components, Services, Directives, Routing and Navigation, Pipes, Modules, etc. in no time-on the fly.
It declares no license on GitHub. Public does not mean open source: without a license, nobody is granted the right to reuse it.
Its maker has not tagged a system, so it is unknown here. Its README says what it needs.
⚡ Pi, the coding agent, compiled ahead of time to one native executable. 10× faster to start, 7× less CPU and 4.5× less memory than Pi on Node. Linux, macOS, Windows, ARM64 and Android (Termux).
Open "Take it" on its page: Take My Repo writes an install plan for your machine and hands it to your AI agent (Claude Code, Codex or Cursor), which asks you before each step. Take My Repo has not tested it on any machine.
Its last change on GitHub was on 2019-08-02. Take My Repo does not judge from that whether it is maintained.
Nobody has reviewed it on Take My Repo yet, which says nothing about its quality.
Fridax enables you to read variables and intercept/hook functions in Xamarin/Mono JIT and AOT compiled iOS/Android applications.
:boom: Customizable Angular UI Library based on Eva Design System :new_moon_with_face::sparkles:Dark Mode
Angular, NgRx, Angular CLI & Angular Material Starter Project
Design-stage semantic compiler for Effect v4: TypeScript builders, typed IR, Rust code generation, and compiler-guided migration.
A JavaScript tutorials for beginners, An introduction to JavaScript programming languages building blocks, step-by-step guide to JavaScript
Lets go-through, learn and understand different logical Javascript exercises and algorithms for beginners.
A HTML5 tutorials for beginners, An introduction to HTML5 building blocks, step-by-step guide to HTML5
A Web concepts tutorials for beginners, An introduction to Web Design Development core terminologies and fundamentals
A Typescript fundamentals tutorials for beginners, An introduction & step-by-step guide to Typescript language latest features in combination with ECMAScript 5,6,7
Learn to write Unit Testing and Integration Testing of Angular application for multiple types of components, directives, dependencies, routers and services.